Introduction / Hook
Imagine a dessert that arrives in a delicate puff of sweetness, where each bite releases a whisper-soft cloud of choux pastry, a kiss of vanilla cream, and a glossy glaze that catches the light like a jewel. A Cream Puff Cake with Pastry Cream is not merely a dessert; it’s an edible celebration of texture and contrast. The outer shells crackle with a gentle, almost celebratory snap, giving way to a tender, airy interior that holds the secret treasure of silky custard within. It’s the kind of dessert that makes a table feel special—the kind you pull out for birthdays, anniversaries, or simply a weekend culinary adventure that ends in delighted sighs. The aroma alone—a perfume of warm milk, vanilla beans, and a hint of butter—creates an invitation to slow down, gather round, and savor every spoonful together.
What makes this cake truly remarkable is its balance: the lightness of the pastry, the richness of the pastry cream, and the brightness of a well-chosen glaze or fruit topping all working in harmony. It’s a dessert that feels both luxurious and approachable, something you could master with patient technique and a pinch of patience. There’s a sense of theater in the creation process—the piping, the layering, the moment when the pastry cream peeks from between tender shells—yet the reward is refreshingly simple: a perfectly chilled slice that tastes like a celebration in every bite. Whether you’re a seasoned baker or an enthusiastic beginner, this Cream Puff Cake invites you to play with textures, patterns, and toppings, turning what could be a classic into a personal, shareable moment.
In this description, you’ll discover why this cake has a universal appeal—the kind that transcends occasions and rituals—and how to coax every nuance from the batter, the cream, and the finish to create a show-stopping dessert that still feels comforting and familiar.
The Story Behind the Dish
Choux pastry, the building block of the traditional cream puff, has a storied place in French patisserie. Its birth is often traced to French kitchens of the 16th to 17th centuries, a time when pastry chefs were experimenting with how to trap steam inside dough to yield something unexpectedly light. The name “pâte à choux” evokes its final form—dough that puffs into hollow shells when baked, ready to be filled with sweet or savory fillings. The technique is deceptively simple: a small amount of fat and liquid cooked into a dough, then eggs beaten in until the batter thickens and shines. Bake, and the shells rise with a hollow center that eagerly soaks up creamy fillings.
Pastry cream, or crème pâtissière, has its own illustrious lineage as the custard heart of countless French desserts—from éclairs to mille-feuille. Made with milk or cream, eggs, sugar, and a touch of starch to set the custard, pastry cream is the silky backbone that carries the flavor of vanilla and, depending on the kitchen, a hint of lemon or almond. When these two elements come together—a crisp, airy choux shell and a velvety, lush pastry cream—the result is something greater than the sum of its parts: a dessert that feels both refined and comforting, elegant enough to grace a special occasion table and friendly enough to be made for a casual family dessert.
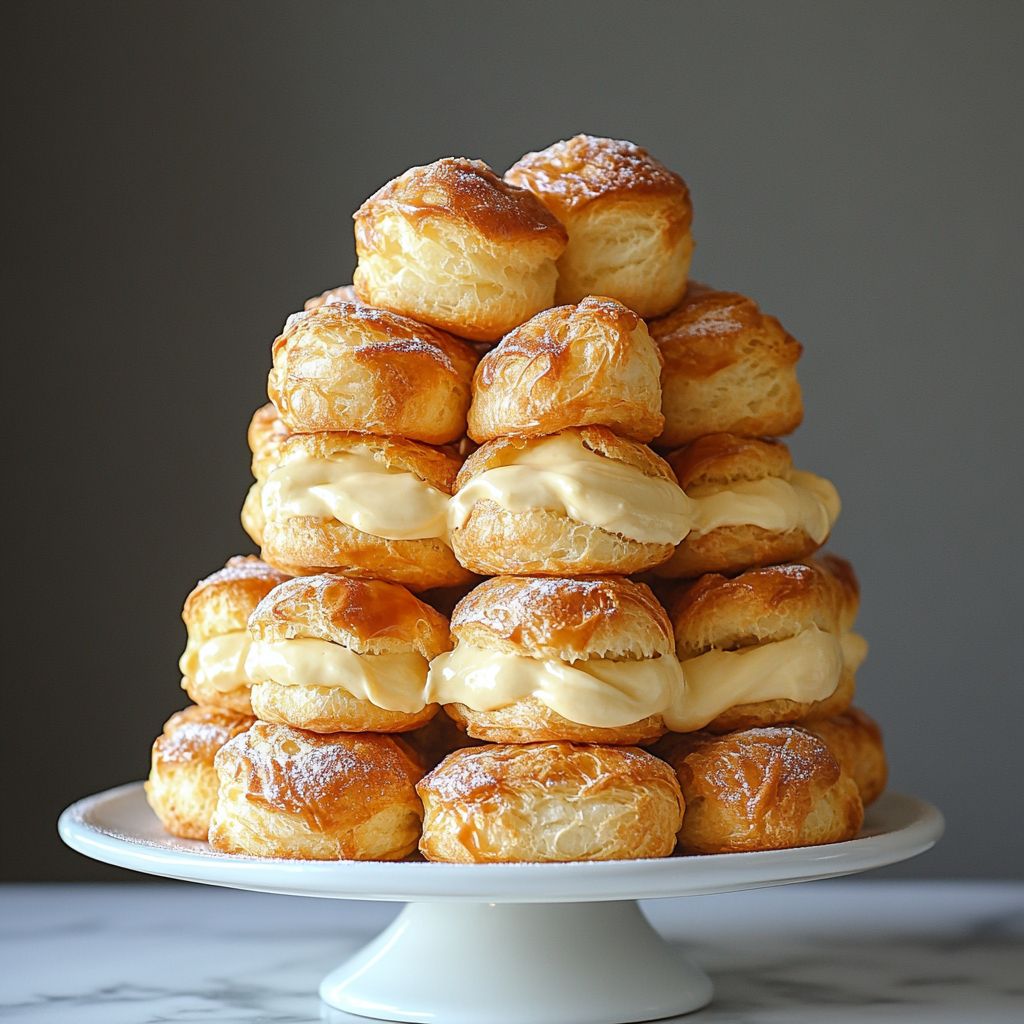
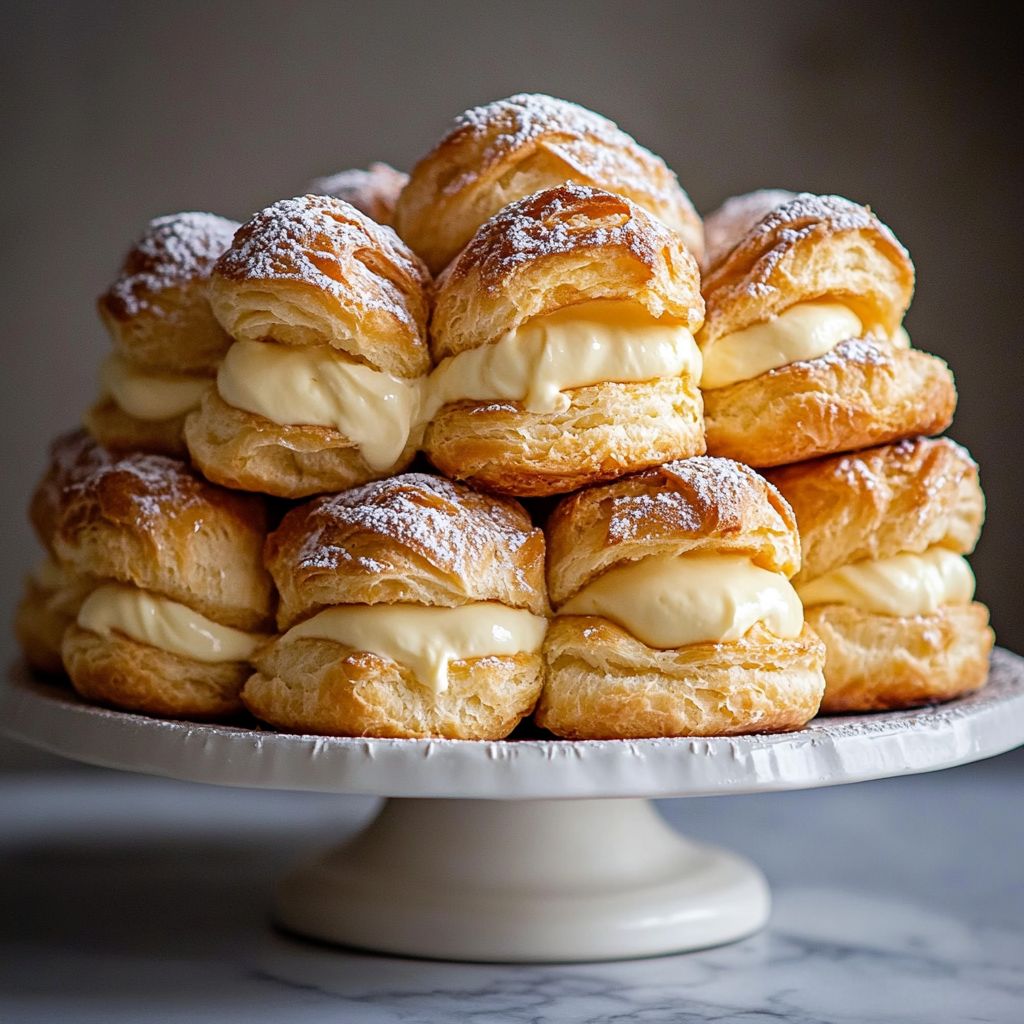
The Cream Puff Cake version builds on that heritage, transforming individual cream puffs into a dramatic, sleek cake form. Picture a sheet or layered arrangement of cream puffs nested into a delicate lattice of pastry cream, then finished with a glistening glaze and scattered fruit or chocolate shavings. It’s a modern homage to classic techniques, a flexible platform for creativity, and a nod to the timeless joy of a pastry that feels at once nostalgic and new. In many kitchens, this dessert has become a favorite because it marries the theatrical presentation of a cake with the intimate, comforting satisfaction of a well-made cream puff. It’s a dish that travels well from a family kitchen to a festive table, carrying with it the promise of “just one more bite” and the memory of a moment shared over something truly special.
Why You’ll Love This Recipe
- Impressive yet approachable: The visual impact of a layered cream puff cake makes it a centerpiece, but the technique is approachable with careful piping and assembly.
- Two textures, one mouthfeel: Crisp outer shells give way to a cloud-like interior, while the pastry cream adds silkiness that lingers on the palate.
- Versatile flavor canvas: Vanilla is classic, but you can customize with citrus zest, espresso, chocolate, or almond to suit the occasion and the eater’s preferences.
- Make-ahead friendly: Bake the choux shells and whisk the pastry cream in advance; you can assemble close to serving time for a fresh, pristine appearance.
- Flexible on occasion: Perfect for birthdays, anniversaries, Easter tables, weddings, Sunday dinners, or a celebratory weekend bake with friends.
- Glaze and toppings with personality: A light glaze, a dusting of confectioners’ sugar, fresh berries, chocolate shards, or a cascade of caramelized nuts can tailor the look and taste to your mood.
Flavor Profile & Texture
The flavor profile of a Cream Puff Cake with Pastry Cream is a study in balance. The choux pastry itself carries a mild, almost neutral sweetness and a gentle eggy richness that sets the stage for the star filling. When baked properly, each shell has a crisp, delicate exterior that shatters slightly with the first bite, giving way to a nearly airy interior that feels like a small, edible cloud. The pastry cream inside adds depth: a custard-like silkiness that is rich but not heavy, with vanilla notes that are warm and slightly aromatic. If you choose to infuse the cream with vanilla bean, the speckled custard within a pale yellow glow becomes a visual and aromatic delight as well.
In terms of texture, the contrast is key. The crisp outside of the choux shells contrasts with the pillow-soft interiors and the velvety pastry cream. When you take a forkful, you get a snap from the outer shell, a melt-in-your-mouth moment from the interior, and a creamy, luxurious center that lingers on the tongue. The glaze or finish on top adds another dimension: a glossy sheen that can be lacquered with a thin sugar glaze, a drizzle of melted chocolate, or a bright berry coulis that adds a tart fruitiness to cut through the custard’s sweetness. The overall sensation is one of refined indulgence with a comforting, almost nostalgic core—the kind that’s as satisfying to taste as it is to look at on a holiday or celebratory dessert table.
Occasions & Pairings
This Cream Puff Cake is tailor-made for moments that deserve a touch of celebration. It’s equally at home as a show-stopping centerpiece for a holiday dessert buffet or as a crowd-pleasing finale for a casual dinner party. Its flexibility makes it a reliable choice for family gatherings, spring celebrations, or weekend indulgences that you want to savor without fuss.
Pairing ideas to elevate the experience:
- Drinks: A light sparkling wine, a late-harvest riesling, or a bright, fruity rosé complements the vanilla and pastry cream without overpowering it. For non-alcohol options, a cup of robust coffee or a tea with citrus notes can be exquisite.
- Fruit accents: Fresh berries (strawberries, raspberries, blueberries) or a sliced fig arrangement add a pop of color and brightness that balances the richness of the cream.
- Side dishes: A crisp green salad with a citrus vinaigrette or a small plate of whipped mascarpone with fruit compote can echo the dessert’s creaminess in a lighter way.
- Texture companions: A sprinkle of toasted almond slivers, pistachio crumbs, or delicate chocolate shavings adds another layer of crunch and aroma.
Tips, Variations & Substitutions
While the core idea is simple—choux shells sandwiching pastry cream—this dessert invites customization. Here are ideas to tailor it to your kitchen, dietary needs, or seasonal ingredients:
- Vanilla variations: Infuse the pastry cream with lemon zest, orange zest, or a cinnamon stick for a warm spice note. A touch of espresso powder can turn it into a coffee-kissed custard.
- Chocolate lovers: Fold a bit of melted dark chocolate into the pastry cream or layer with a thin chocolate glaze on top for a mocha-chocolate edition.
- Fruit-forward version: Add a layer of fresh fruit or fruit jam between shells and cream, or top with berry compote for a bright finish.
- Dairy-free option: Prepare a dairy-free pastry cream using almond or coconut milk with a starch-based thickener, and substitute dairy-free butter in the shells if your recipe supports it—note that choux typically relies on eggs for structure, so the texture may vary slightly.
- Gluten-free adaptation: Use a gluten-free all-purpose flour blend in the choux dough. The texture can be slightly different, but with careful hydration and proper piping, you can achieve a similarly light shell.
- Make-ahead ideas: Bake shells up to 1 day in advance and store in an airtight container at room temperature; keep pastry cream chilled and whisk before assembly. Assemble the day of serving for the freshest texture, or assemble a day ahead and refrigerate, letting the shells absorb some of the cream’s moisture to soften just a touch.
- Shape and presentation: For a dramatic effect, pipe the shells into uniform rounds and arrange them in a ring around a central cake-ready layer of pastry cream. Alternatively, create a square or rectangle sheet cake with a lattice of choux puffs on top for a modern look.
Storage & Make-Ahead Ideas
To maintain the best texture and flavor, approach storage with a plan that respects the delicate balance of shell and cream. Here are practical tips to keep this dessert at its best:
- Shells: Baked choux shells can be stored in an airtight container at room temperature for up to 2 days, where they retain their crispness if kept away from humidity. For longer storage, freeze the shells in a single layer on a parchment-lined tray, then transfer to an airtight container. Recrisp in a low oven (around 300°F/150°C) for 5–7 minutes before serving.
- Pastry cream: Pastry cream should be kept refrigerated and used within 2–3 days. Cover the surface with plastic wrap to prevent a skin from forming. If a skin forms, whisk vigorously to smooth it out before using. You may also press a thin layer of plastic wrap directly onto the surface of the custard to minimize skin formation.
- Make-ahead assembly: For best texture contrast, store shells and pastry cream separately, then assemble shortly before serving. If you must assemble ahead, do so no more than a few hours in advance; the shells will begin to soften as they absorb moisture from the cream.
- Freezing pastry cream is not recommended as it can alter texture; however, you can freeze the assembled cake for a short period and thaw in the refrigerator, though some loss of the pristine texture may occur. For that reason, fresh assembly is preferred for the best experience.
Fun Facts & Trivia (Optional)
Did you know that choux pastry is named after the French word for cabbage, chou? Its round, hollow shells resemble little cabbages, which is where the playful nickname originated. Cream puffs have long been a staple in patisseries around the world, with countless regional twists—from crème éclairs filled with vanilla custard to light, airy profiteroles nestled with sorbet. In some culinary circles, a cake built from puff pastry shells is celebrated as a modern take on the “gâteau de mille-feuilles” tradition, where layers of delicate textures meet bold, complementary fillings. The art of pastry cream is a testament to classic French technique—egg yolks, milk, sugar, and cornstarch or flour converging into a custard that can be coaxed into infinite flavors, all while maintaining that silken, voluptuous mouthfeel that defines traditional pâtisserie.
In many family kitchens, this dessert becomes a memory-maker. It’s the kind of recipe passed down through generations with a wink and a nod: a few secrets about how long to bake the shells for the perfect hollow center, or how much vanilla bean to use to avoid overpowering the custard. It’s also a celebration of technique—how the dough comes together on the boil, how the eggs are incorporated to give structure, and how a glossy glaze can transform a simple plate into a gallery-worthy presentation. The Cream Puff Cake with Pastry Cream is a bridge between technique and comfort, between a meticulously crafted pastry and a dessert that welcomes everyone to the table with open arms.
Whether you’re chasing a sense of culinary adventure or seeking a dessert that feels timeless, this cake offers a delicious path forward. It invites you to savor the process as much as the result—the careful piping, the steady hand, the moment of folding in vanilla and the patience to cool the pastry cream just right. By the time you slice into the finished cake, you’ll understand why this dessert has a lasting appeal: it’s a celebration of lightness and richness, a flirtation between classic technique and contemporary presentation, and a reminder that some of the best desserts are the ones that feel both familiar and wonderfully new at the same time.
Ingredients
Choux Base
- 1 cup water
→ Water is the liquid that, with heat, drives the formation of steam inside the batter, helping the choux puff and set into a light, hollow structure ideal for a cream-puff-style cake. Use fresh, cold-to-room-temperature water for accurate measurement and consistent hydration. Do not substitute with dairy at this stage, as fats and proteins will alter the rise. - 1/2 cup unsalted butter
→ Butter contributes richness, flavor, and the tender crumb in choux pastry. It also coats the starches to help them gelatinize properly. Use unsalted butter for better control over salt in the dough, and melt it fully with the water so it integrates smoothly when the dough is formed. - 1 tablespoon granulated sugar
→ Sugar adds a touch of sweetness and helps with browning. It is optional if you’re aiming for a less sweet, more savory outcome, but it supports a more even, golden crust. - 1/4 teaspoon salt
→ Salt enhances overall flavor and helps balance the sweetness. If using salted butter, reduce or omit this amount accordingly. - 1 cup all-purpose flour, sifted
→ The flour provides the structure after the liquid boils and the dough is stirred until it forms a smooth paste. Sifting helps prevent lumps and yields a uniform dough that rises evenly in the oven. - 4 large eggs, at room temperature
→ Eggs bind and enrich the dough, contributing to its structure and lift. Add eggs one at a time after the dough has cooled slightly from the heat, ensuring each egg is fully incorporated before adding the next. Room-temperature eggs blend more smoothly, giving a glossy, cohesive batter that puffs well.
Pastry Cream
- 2 cups whole milk
→ Milk is the base for the classic pastry cream, delivering richness and creaminess. Use whole milk for the best texture; heating it gently helps avoid scorching and ensures a smooth custard. - 1/2 cup granulated sugar
→ Sugar sweetens the custard and helps with its silky mouthfeel. Balance with the amount of vanilla and the egg yolks to avoid a too-sweet finish. If you prefer a less sweet cake, you can reduce slightly, but do not omit entirely. - 1/4 cup cornstarch
→ Cornstarch is the thickening agent that yields a smooth, sturdy pastry cream without curdling. Whisk the cornstarch with a small amount of the hot milk to make a slurry before adding to the hot milk, and then cook until the mixture thickens and just comes to a boil to activate the starch. Sift if needed to prevent lumps. - 4 large egg yolks
→ Yolks provide richness, color, and extra thickening. Temper the yolks by slowly whisking in hot milk, then return to the pot so the custard cooks evenly without scrambling. Use yolks at room temperature for best emulsification. - 2 teaspoons pure vanilla extract
→ Vanilla adds deep aroma and flavor to the pastry cream. Use high-quality vanilla or, for a more pronounced vanilla note, scrape a vanilla bean and add the seeds along with the extract at the end. If using a bean, simmer with the milk and remove before finishing. - Pinch of salt
→ A small salt pinch enhances sweetness and rounds the custard’s flavor. This helps avoid a flat, one-note sweetness. - 2 tablespoons unsalted butter, cut into small pieces (optional)
→ Finishing with butter wards off a waxy mouthfeel and adds a glossy finish to the pastry cream. Add while the custard is hot, off the heat, and whisk until fully melted and incorporated.
Simple Syrup for Moisture (optional)
- 1/4 cup granulated sugar
→ A light syrup helps keep the baked choux layers moist and pliable, ensuring the cake stays tender after assembly. It also aids in achieving a pleasant sheen if you brush it on the surface. - 1/4 cup water
→ Water dissolves the sugar to form a quick, clear syrup. Use a clean pan and simmer until the sugar is fully dissolved, then cool to room temperature before brushing on the layers. - 1 teaspoon light corn syrup (optional)
→ A touch of corn syrup helps prevent crystallization and gives a smoother, glossier finish to the syrup. This is optional and can be omitted if you prefer a pure sugar-water syrup.
Toppings (Glaze)
- 6 oz dark chocolate, chopped
→ High-quality dark chocolate provides rich flavor and a glossy finish when melted with cream. Chop finely so it melts evenly for a smooth glaze. - 1/2 cup heavy cream
→ Heavy cream creates a luscious ganache when heated and poured over the chocolate. The cream-to-chocolate ratio influences the firmness of the glaze—use more cream for a looser glaze or less for a thicker coating. - 2 tablespoons unsalted butter, room temperature (optional)
→ Butter adds shine and a silky texture to the glaze. Whisk into the warm ganache off heat until completely emulsified for a smooth finish. - 1 teaspoon vanilla extract (optional)
→ A touch of vanilla enhances chocolate flavor and provides a rounded finish to the glaze. Use if you want a slightly more aromatic glaze.
Instructions
- Preheat your oven to 425°F (220°C) and line two large baking sheets with parchment paper or silicone mats, ensuring even heat distribution and easy removal of the puff shells.
→ Starting with a hot oven and prepared trays creates strong steam in the dough for maximum rise and prevents sticking or spreading of the shells. - Set up a heavy-bottom saucepan and measure your ingredients: 1 cup water, 1/2 cup unsalted butter, 1 tablespoon granulated sugar, and 1/4 teaspoon salt, so everything is ready to combine without delay.
→ Precise measurement and mise en place help the dough form a smooth, cohesive paste and avoid scorching the fats or under-seasoning the batter. - Combine water, butter, sugar, and salt in the saucepan and bring to a vigorous boil over medium-high heat, stirring until the butter is melted and the sugar and salt are dissolved.
→ Boiling ensures the starch will gelatinize properly when the flour is added, contributing to the choux’ characteristic structure and hollow interior. - Immediately remove the pan from heat and add all at once 1 cup sifted all-purpose flour, stirring with a wooden spoon until a smooth, cohesive paste forms and pulls away from the sides of the pan.
→ The flour absorbs the hot liquid to create a thick paste; returning it to the heat briefly helps dry the dough so it can hold the eggs without being goopy. - Return the dough to the burner for about 1 to 2 minutes, stirring constantly, until the bottom of the pan looks slightly glossy and a thin film forms as you drag your spatula across it. Then transfer the dough to a warm bowl and let it cool for 2 to 3 minutes.
→ A modest cooling prevents the eggs from scrambling when added, while still keeping enough warmth to activate starch gelatinization for structure. - Beat in the eggs one at a time, about 1 large egg every 30 seconds, until the dough is smooth, glossy, and holds a soft peak when stretched; the dough should stream in a thick ribbon from the spatula.
→ Proper emulsification with room-temperature eggs creates a stable batter that traps air for lift and yields a light, hollow shell when baked. - Transfer the finished choux dough to a piping bag fitted with a large round tip or use a spoon to portion rounds onto the prepared sheets, leaving at least 1 inch (2.5 cm) of space between each to allow for expansion.
→ Even-sized rounds bake evenly and prevent crowding, which would cause them to spill and lose their round shape. - Bake the shells at 425°F (220°C) for 15 minutes without opening the oven door to preserve the steam that drives rise, then reduce the temperature to 375°F (190°C) and continue baking for 20 to 25 minutes until they’re deep golden and feel light and hollow when tapped.
→ The initial high heat creates peak expansion; lowering the heat afterward dries the centers without browning the exterior too quickly, preventing sogginess. - Turn off the oven, crack the door slightly, and let the shells dry in the oven for 10 to 15 minutes to avoid collapsing; then remove and cool completely on a wire rack.
→ Drying reduces internal moisture, which stabilizes the shells for filling and helps them stay crisp rather than soggy. - Optional: If you want flatter, more even layers for a cake-style presentation, slice the cooled shells horizontally with a sharp serrated knife to create even “layers” and caps for filling.
→ Flattened surfaces provide clean, predictable layers and give pastry cream a uniform platform for even layering. - Meanwhile, prepare the pastry cream: warm 2 cups whole milk in a heavy-bottomed saucepan until just simmering.
→ Gentle heating prevents scorching and ensures a smooth, silky custard base that sets evenly without graininess. - Whisk together 4 large egg yolks, 1/2 cup granulated sugar, 1/4 cup cornstarch, and a pinch of salt in a bowl until pale and thick.
→ The yolks provide richness; whisking with sugar and cornstarch creates a stable emulsion that thickens to a smooth custard when heated. - Ladle a small amount of the hot milk into the yolk mixture to temper it, whisking constantly, then gradually whisk the tempered yolk mixture back into the remaining hot milk in the saucepan.
→ Tempering prevents scrambling and ensures the custard thickens evenly without curdling. - Cook the custard over medium heat, whisking constantly, until it thickens and just comes to a boil; cook for 1 minute more, then remove from heat. Strain through a fine-mesh sieve into a clean bowl.
→ Straining removes any lumps and ensures a silky texture; boiling activates the cornstarch for proper thickening. - Whisk in 2 teaspoons pure vanilla extract and 2 tablespoons unsalted butter until fully melted and incorporated, then push a sheet of plastic wrap directly onto the surface and chill until cold, at least 2 hours.
→ Vanilla and butter enrich the custard’s aroma and sheen; the wrap prevents a skin from forming as it cools and aids quick setting. - Prepare a simple glaze by heating 1/2 cup heavy cream until just simmering, pouring it over 6 oz chopped dark chocolate, letting stand 2 minutes, then whisking until smooth and glossy; whisk in 1 teaspoon vanilla and optionally 2 tablespoons butter for extra shine. Allow glaze to cool to a pourable consistency.
→ The ganache glaze provides a rich, glossy finish that adheres to the puffs and adds a satin sheen when set. - To assemble the cake, fill a piping bag fitted with a small round tip with the chilled pastry cream; poke a small hole or cut a slit in each cooled puff and pipe a generous amount of pastry cream into the interior, then replace the cap or top to reseal.
→ Filling distributes creamy richness through each bite and keeps the puffs moist and flavorful without becoming soggy from excess liquid. - If you sliced shells earlier, use the flat bottoms as a base and stack the filled tops in a visually appealing ring or layered tower on a serving plate, arranging puffs with the rounded sides facing outward to resemble a traditional cream puff cake.
→ Stacking puffs creates visible layers of cream and pastry, producing a cake-like presentation with texture and height. - Brush the assembled cake lightly with the prepared simple syrup (optional) to maintain moisture and add a slight gloss, then pour or drizzle the chocolate glaze over the top and let it cascade down the sides for a dramatic finish.
→ Syrup keeps the surface moist and the glaze adheres better; the glaze adds flavor and a professional, glossy look to the finished cake. - Chill the completed cake for at least 1 hour to set the pastry cream and glaze, making slicing clean and serving neat.
→ Resting firms the layers, prevents the filling from oozing, and helps the glaze set for a stable, attractive presentation. - Serve chilled or at room temperature, using a sharp serrated knife to cut cleanly through the choux layers and pastry cream, and present with extra glaze on the plate if desired.
→ A clean cut showcases the creamy interior and crisp shells; temperature affects texture and mouthfeel, so choose your preferred serving temperature.

Notes
These Cream Puff Cake with Pastry Cream are light, airy layers of choux filled with silky vanilla pastry cream and finished with a glossy chocolate glaze. For best results, bake the choux until deeply golden and dry, then cool completely before filling to keep the layers crisp. The pastry cream can be made a day ahead and kept chilled; whisk until smooth before filling. You can customize the flavor by infusing the milk with vanilla bean, citrus zest, or a splash of liqueur, or by folding in a swirl of espresso or cocoa into the pastry cream. To assemble, split the cooled choux into even discs, pipe or spoon pastry cream between layers, and brush with a light sugar syrup if you want extra moisture. Finish with the chocolate glaze by making a ganache: heat the cream, pour over chopped chocolate, stir until smooth, whisk in butter and vanilla for shine. The assembled cake is best served the day it’s assembled, but properly stored it will hold for up to 1–2 days in the fridge. Leftover choux shells can be frozen unfilled for later use; fill fresh for best texture.
- Make ahead and storage: Bake the choux shells a day ahead and cool completely; pastry cream can be made 1–2 days ahead and kept chilled. Assemble the cake shortly before serving to preserve crispness.
- Filling technique: Once the shells are cooled, fill just before serving for the freshest texture. Piping pastry cream with a small round tip creates clean, even layers.
- Glaze and finish: For a glossy glaze, pour the warm ganache over the chilled cake and spread evenly. If you prefer a thinner glaze, use a bit more cream in the ganache.
- Flavor variations: Add vanilla bean seeds to the pastry cream, or infuse the milk with citrus zest, coffee, or a liqueur for a different profile. Dust with cocoa powder or decorate with shaved chocolate for contrast.
- Freezing tips: Bake and cool the choux shells, then freeze unfilled. Thaw and fill before serving for best texture; pastry cream does not freeze well when filled.
Tips
Tips for Perfect Cream Puff Cake with Pastry Cream
- Choux base: Use fresh, cold-to-room-temperature water and fully melted butter so the dough comes together smoothly. Have the flour measured and sifted before you start—the smoother the paste, the better the rise.
- Heat control: Bring the water, butter, sugar, and salt to a rolling boil before you add the flour. Stir vigorously to form a smooth paste, then cook for about 1 minute more to dry the dough slightly. This step helps the shells puff and hold their hollow center.
- Egg integration: Let the dough cool for a few minutes after cooking, then add eggs one at a time, fully incorporating each before adding the next. Room-temperature eggs emulsify more evenly and help achieve a glossy, cohesive batter.
- Consistency check: The final batter should be thick but pipeable—not so stiff that it won’t hold its shape, yet not so loose that it runs. If you overbeat after the first egg, the shells may puff unevenly.
- Shaping and piping: Pipe evenly sized rounds or use a smooth spatula to spread a uniform layer for the cake base. Keep shells roughly the same diameter for uniform baking and assembly. If you’re making individual cream puffs, pipe them close together on the sheet with space between for expansion.
- Oven setup and steam: Bake at a hot temperature to encourage a strong rise. If possible, create a bit of steam in the oven (a shallow pan with hot water on the rack below works for some ovens). Do not open the door during the initial rise—venting too early can cause collapse.
- Doneness and cooling: The choux should be deeply golden and dry to the touch. After baking, poke a small vent with a skewer to release steam and help the centers set. Cool completely on a rack before filling to prevent sogginess.
- Preventing soggy layers: If you plan to assemble later, you can brush the cut surfaces with a light syrup (simple syrup) to keep them moist but not soggy. Let the syrup dry slightly before layering with pastry cream.
- Pastry cream prep: Strain the custard if you see any lumps after cooking. Keep the heat moderate when tempering yolks—slowly whisk hot milk into yolks, then return to the pot and cook until it just comes to a boil to activate the cornstarch. Do not overcook, or it may break or become grainy.
- Vanilla depth: Use good-quality vanilla and consider adding the seeds from a vanilla bean with the extract for a deeper aroma. If using a bean, simmer with the milk and remove before finishing the custard.
- Flavor balance: Pastry cream should be creamy and not overly sweet. If you prefer a less sweet finish, reduce the sugar slightly and taste as you go. A pinch of salt helps balance sweetness.
- Butter finishing: Whisk in small pieces of butter into hot pastry cream for a glossy finish and extra silkiness. This step also helps the cream set to a smoother texture when cold.
- Storing and filling: Chill the pastry cream thoroughly before filling. Fill shells with a piping bag fitted with a long nozzle for clean, even filling without crushing the shells. If not filling immediately, store the cream in the fridge and cover tightly to avoid a skin forming.
- Simple syrup moisture: If using the syrup, brush the layers while still warm but not hot—this keeps them pliable without making them soggy. Store the syrup-covered shells in a single layer until you’re ready to assemble.
- Glaze tips: For the glaze, melt chocolate with warm cream just until smooth, then whisk in butter off the heat for shine. A little vanilla enhances the chocolate’s depth. Let the glaze cool slightly before pouring to avoid sliding off thinly.
- Assembly timing: Chill the filled cake briefly before glazing to help the pastry cream set and prevent the glaze from sliding.
- Make-ahead options: Bake and cool the choux shells in advance and freeze unfilled shells. Thaw, fill, and glaze on the day you plan to serve for the best texture and freshness.
- Temperature and safety: Keep the finished dessert refrigerated if not serving immediately. Cream puffs and pastries with custard should be kept cold to maintain texture and food safety.
FAQ
What is Cream Puff Cake with Pastry Cream?
A cake made by stacking light, hollow choux pastries (cream puffs) with silky vanilla pastry cream between the layers. It’s typically finished with a glaze or dusting and can be served chilled or at room temperature. Makes about 8–12 servings depending on size.
What ingredients do I need for this Cream Puff Cake?
For the choux pastry:
– 1 cup (240 ml) water
– 1/2 cup (115 g) unsalted butter
– 1/4 teaspoon salt
– 1 teaspoon sugar (optional)
– 1 cup (120 g) all-purpose flour
– 4 large eggs
For the pastry cream:
– 2 cups (480 ml) milk
– 1/2 cup (100 g) granulated sugar
– 4 large egg yolks
– 1/4 cup (32 g) cornstarch
– 2 teaspoons vanilla extract
For assembly and finishing:
– 1–2 cups whipped cream (optional)
– Chocolate glaze or vanilla glaze (or powdered sugar) for topping
– Fresh fruit or berries for garnish (optional)
How do I make the pastry cream?
1. In a medium saucepan, scald the milk with half the sugar and vanilla. 2. In a bowl, whisk egg yolks with the remaining sugar and cornstarch until smooth. 3. Slowly pour a ladle of hot milk into the yolks while whisking to temper, then pour the mixture back into the saucepan. 4. Cook over medium heat, whisking constantly, until the mixture thickens to a custard consistency. 5. Remove from heat, strain if desired, then cover with plastic wrap directly on the surface and chill for at least 2 hours (or overnight) until cold. 6. Stir briefly before using; pastry cream should be thick and silky.
How do I prepare the choux pastry?
1. Preheat oven to 200°C (400°F). Line baking sheets with parchment. 2. In a saucepan, combine water, butter, salt, and sugar; bring to a boil. 3. Remove from heat, add flour all at once, and stir vigorously until the mixture forms a smooth ball that pulls away from the sides of the pan. 4. Return to low heat and cook for 1–2 minutes to dry out the dough. 5. Transfer to a bowl and let cool for 5–10 minutes. 6. Beat in eggs one at a time, fully incorporating each egg before adding the next. The dough should be glossy and hold soft peaks. 7. Pipe or spoon rounds (about 1–1.5 inches wide) onto the baking sheets. 8. Bake for 20–25 minutes, until puffed and golden. Do not open the oven door during the first 15 minutes. 9. Cool completely on racks before filling or stacking.
How do you bake the cream puffs?
Once baked, remove to a rack and let cool completely. For best results, bake one sheet at a time with ample space between puffs. If some puffs are flat or collapsed, you can hollow them gently with a small knife or fill them with pastry cream using a piping bag after they are cooled.
How do I assemble the cake with cream puffs and pastry cream?
Option A (fill puffs, then stack): Fill a piping bag with pastry cream and insert into each hollow puff to fill. Arrange the filled puffs on a serving platter in a single layer, pipe a thin layer of pastry cream on top, then add another layer of filled puffs. Repeat for a second or third layer as desired. Top with a final thin frosting of pastry cream or glaze. Option B (layer with cream between whole puffs): Place puffs side by side on the base, pipe cream between layers as you stack, then finish with a layer of cream on top. Chill for 1–2 hours to set the cream before glazing or serving.
What glaze or topping should I use?
Try a glossy chocolate glaze or a simple vanilla glaze:
- Chocolate glaze: 1 cup (170 g) semisweet chocolate, 2 tablespoons butter, 1 tablespoon corn syrup. Melt together until smooth and glossy; drizzle over the top.
- Vanilla glaze: 1 cup powdered sugar, 2–3 tablespoons milk, 1/2 teaspoon vanilla extract. Stir until smooth and drizzle over the cake.
- Other options: dust with powdered sugar, or garnish with fresh berries and whipped cream.
How should I store and serve this cake?
Store loosely covered in the refrigerator for up to 2–3 days. If you’ve already glazed the cake, keep it refrigerated and bring to room temperature for about 20–30 minutes before serving to enjoy the best texture and flavor. If not assembled yet, you can keep baked choux puffs stored at room temperature in an airtight container for up to 1–2 days.
Can I customize flavors or make it dairy-free?
Yes! Flavor ideas include lemon zest or vanilla bean in pastry cream, or a coffee-chocolate glaze. For dairy-free versions: use almond or coconut milk in the pastry cream, vegan butter or oil in the choux dough, and a dairy-free glaze (such as dairy-free chocolate). Keep in mind that eggs are essential to choux; you may need to adapt with vegan egg replacers if a strict vegan version is required, though results vary.
Tips and troubleshooting
Common issues and fixes:
– Puff collapse after baking: oven temperature too low or opening the door too early. Bake at 200°C (400°F) and avoid peeking.
– Puffs too dense or hollow shells: not enough eggs or dough wasn’t whipped glossy enough. Ensure the dough dries properly before adding eggs, and add eggs one at a time.
– Pastry cream is too thin: cook a bit longer to thicken, or add a touch more cornstarch (dissolved in a little milk) and cook briefly again.
– Pastry cream skin forms: press plastic wrap directly on the surface while chilling to prevent a skin.
– Glaze not setting: slightly warm a portion of glaze to loosen, then re-lightly coat for a smoother finish.