Introduction & Hook
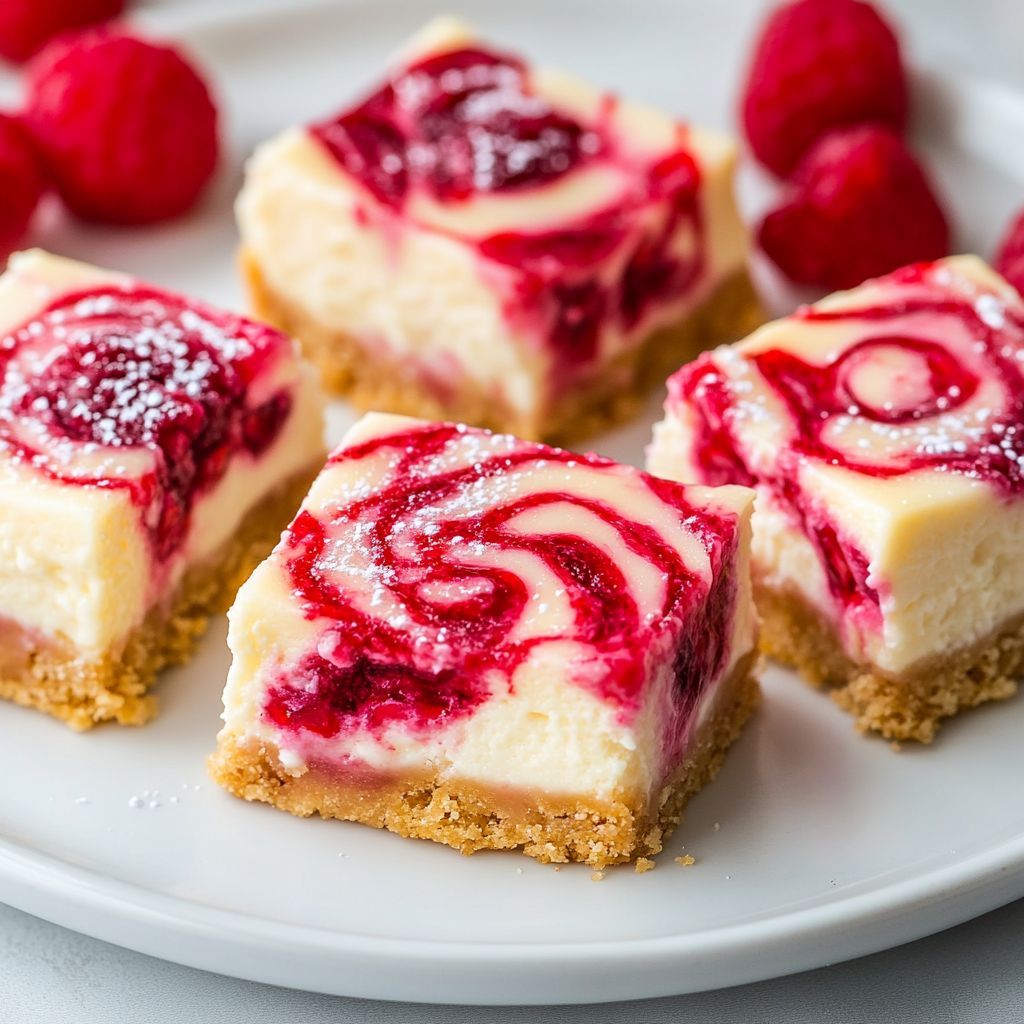
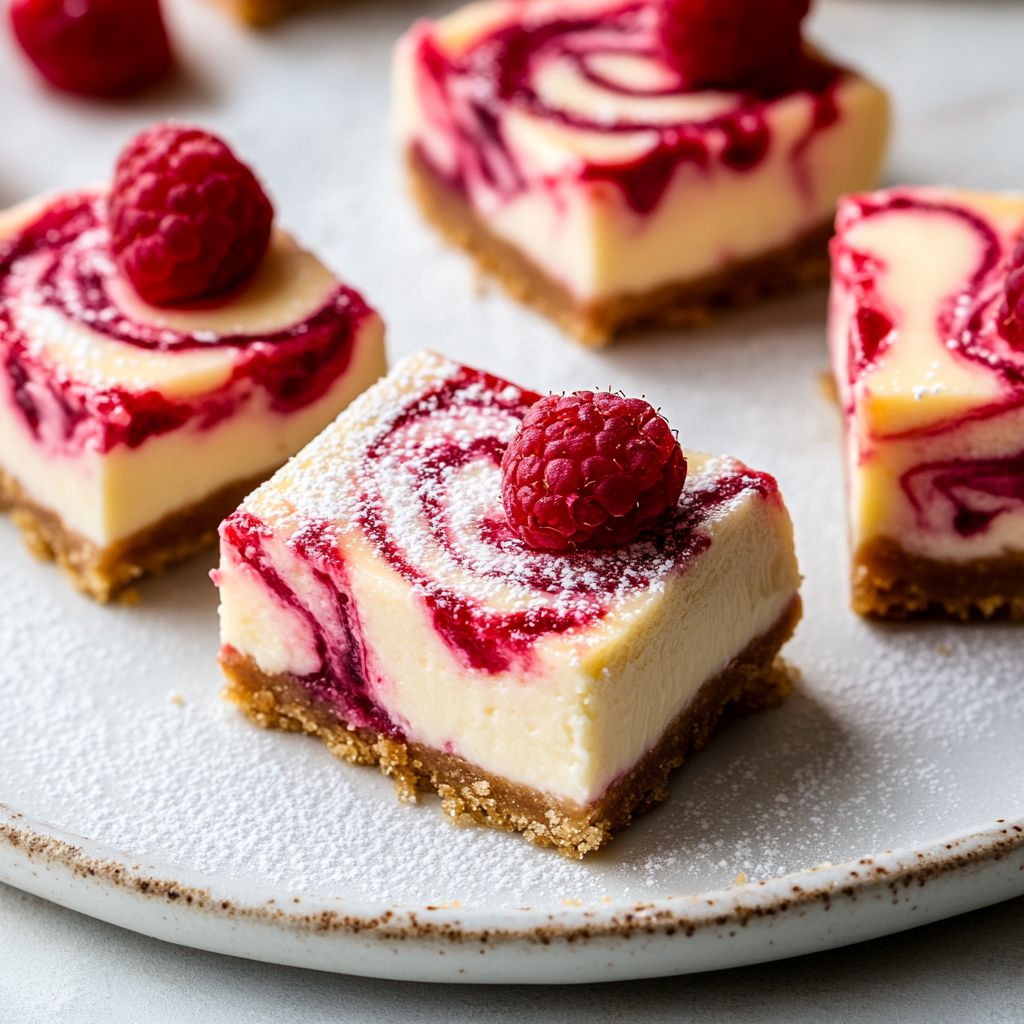
Picture a tray of bite-sized jewels—pale, silky squares crowned with a whisper of blush and a temptingly bright raspberry swirl. Each little morsel promises a moment of pure indulgence: a creamy center that glides across the tongue, a barely-there crack as you bite, and a bright fruit kiss that lingers long after the bite. Homemade Raspberry Swirl Cheesecake Bites are the kind of dessert that makes ordinary weeknights feel special and turns casual gatherings into memorable moments. They’re elegant enough to grace a bridal shower dessert table or a holiday buffet, yet approachable enough for an afternoon treat when the craving for something rich and fruity strikes. The magic lies not just in the flavor, but in the balance—the way the tart-tinted raspberry ribbon threads through a velvety cheesecake, the contrast between a delicate, crumbly crust and a smooth, irresistible filling, and the cool finish that leaves your palate craving another bite.
As you imagine them, you can almost sense the aroma wafting through your kitchen: a hint of vanilla that softens the tang, a citrusy brightness that keeps the richness lively, and a subtle buttery undertone that grounds the sweetness. These bites are more than a dessert; they are a small, refined moment—easy to share, delightful to savor, and perfectly suited for making any occasion feel a touch more special. They also embody a modern, approachable style of baking: you get the elegance of a classic cheesecake but in a compact form that fits on a single platter, making it easier to serve, portion, and enjoy with friends and family. In short, they’re the kind of treat you reach for when you want something comforting, familiar, and a little bit glamorous—without any fuss.
The Story Behind the Dish
Cheesecake has a long and winding history that travels across cultures and centuries. From ancient Greek banquets to the refined New York-style cheesecakes of mid-20th-century diners, the idea of a smooth, tangy cheese filling resting on a biscuit-like base has a universal appeal. The version you see here—portioned into delicate bites with a raspberry swirl—embodies a modern interpretation that honors both tradition and whimsy. It’s a dessert born of the idea that dessert should be shareable without sacrificing indulgence. Miniature desserts have become a beloved trend because they invite sampling, conversation, and a playful approach to flavor and texture. A single bite can deliver a surprising balance of richness and brightness, a reminder that dessert can be both comforting and exciting at the same time.
The idea of swirling fruit through a creamy filling is as old as cheesecake itself, in spirit if not in technique. Fruit swirls, ribbons, and marbled patterns emerged as a way to highlight seasonal produce and add visual appeal. Raspberry, with its vibrant hue and tart-sweet character, pairs exceptionally well with the tang of cream cheese. When transformed into little cheesecake bites, the swirl becomes a tiny piece of artistry—visible yet delicate, a design you can practically taste with your eyes. It’s a plate-friendly dessert that invites guests to pick, nibble, and admire the marbled pattern that runs like a thread of color through the pale filling. This dish, then, is a nod to both history and modern entertaining: a classic flavor elevated through presentation, portion, and the joy of sharing.
In many homes, the best desserts are those that carry a sense of tradition while feeling fresh and doable. The cheesecake bite format is a celebration of that duality—structured enough to feel special, simple enough to make on a weekend, and versatile enough to adapt to different occasions. The raspberry swirl adds a lively note, reminiscent of summer markets and sunlit mornings, while the creamy texture speaks to the timeless comfort of cheesecake. It’s a fusion of memory and novelty, a small bite that carries a big smile.
Why You’ll Love This Recipe
- Portion-controlled indulgence: individual bites mean you can sample without overindulging, and guests can enjoy as many or as few as they’d like.
- Elegant flavor balance: tangy, creamy filling harmonizes with a subtle fruit swirl for a bright, refreshing finish that doesn’t overwhelm the palate.
- Textural contrast: a delicate, crumbly foundation provides a gentle crunch against a velvety center, creating a satisfying mouthfeel from first bite to last.
- Visual appeal: the raspberry ribbon adds a pop of color and artistry, making the tray a centerpiece for any table or party spread.
- Make-ahead friendly: these bites can be prepared in advance and kept chilled, giving you more time to mingle with guests rather than tending a hot dessert.
- Versatile for occasions: suitable for holiday gatherings, showers, birthdays, potlucks, or casual weekend treats—easily dressed up or down to fit the vibe.
- Customizable sweetness: the creamy base allows you to adjust the sweetness to taste with subtle tweaks in the swirl’s intensity, ensuring it appeals to both kids and grown-ups alike.
- Adaptable to dietary needs: with careful substitutions, you can tailor the concept to vegan or gluten-free preferences without sacrificing texture or flavor.
Flavor Profile & Texture
Let your senses guide you as you imagine these bites. The first impression is visual—the satin sheen of the filling and the ruby glow of the raspberry swirl against a pale canvas. As you bring one to your lips, the aroma offers a gentle whiff of vanilla, a hint of citrus, and a clean dairy note that promises smoothness. The initial bite introduces a delicate crack that yields to a luxuriously creamy interior, rich without being overwhelming. The filling carries a refined sweetness—soft, rounded, and lightly tangy—reminiscent of classic cheesecake but lighter in feel when enjoyed in a smaller, bite-sized format.
The raspberry swirl is not merely an afterthought; it’s a lively counterpart that cuts through the richness with brightness and a touch of tartness. When you encounter the swirl, your palate experiences a ribbon of fruit that remains distinct yet complementary, accentuating the cheesecake’s natural creaminess rather than competing with it. This contrast is where the magic happens: the swirl brings a fruity vibrancy, while the filling offers a velvety, almost satin-like texture that glides across the tongue. The crust—subtly crumbly and sturdy enough to support the bite without crumbling away—provides a gentle crunch and a neutral, buttery foundation that allows the filling and swirl to take center stage. The overall effect is a symphony of textures and flavors: smooth, airy yet indulgent; tart, bright but balanced; and cool, comforting with a lingering, refined finish.
Texture-wise, these bites deliver a refined economy of sensation. The outer layer isn’t crusty in the way a cookie would be, but it has enough structure to hold its shape as you pop the piece into your mouth. The interior is lush and pillowy, with enough density to feel substantial without veering into heaviness. The raspberry swirl creates a ribbon of color and flavor that appears in each bite, ensuring that no two mouthfuls are exactly the same and inviting you to savor the variety in a small, repetitive ritual. The finish is clean and airy, with a subtle sweetness that evaporates pleasantly, leaving room for a final, satisfied sigh and the next delicious bite.
Occasions & Pairings
These Raspberry Swirl Cheesecake Bites shine in settings where elegance meets practicality. They are ideal for a stylish dessert table at a wedding or shower, a festive addition to a holiday spread, or a crowd-pleasing option for a birthday party or family gathering. Their bite-sized nature makes them perfect for buffets, trays, and grazing platters, where guests can help themselves without needing utensils. They also make a thoughtful after-school treat or a special-end-of-week indulgence to share with someone you love. The aesthetic of the bites invites a touch of celebration, yet their approachable flavor makes them welcome in everyday moments as well.
Pair these bites with beverages that complement their profile. A light sparkling wine or a citrus-forward tea can echo the brightness in the swirl, while a rich, dark coffee or a creamy latte can echo the cheesecake’s smoothness. For a non-alcoholic pairing, consider a chilled berry shrub or a sparkling water with a splash of lemon to lift the palate between bites. If you’re building a dessert trio or platter, layer in a contrasting bite—perhaps something with a pastry crust and a dollop of cream—to create a balanced, visually appealing spread that takes guests on a mini tour of textures and flavors.
Tips, Variations & Substitutions
Every home baker loves a few flexible ideas to tailor a dessert to mood, season, or dietary needs. Here are some thoughtful approaches to customizing Raspberry Swirl Cheesecake Bites while keeping the essence intact:
- Fruit variations: swap in different fruit ribbons such as strawberry, blackberry, or blueberry for seasonal variety. Each fruit adds its own character—think tang for red berries, or a sweeter note for stone fruits.
- Crust consciousness: if you prefer a gluten-conscious version, consider a crust built from gluten-free cookies or a nut-based base that still delivers a satisfying crunch. The goal is a foundation that balances with the creamy center rather than overpowering it.
- Vegan options: for a vegan adaptation, use plant-based cream cheese alternatives and a non-dairy butter or fat to bind the crust. The texture should remain smooth, with the swirl providing the fruity brightness to counterbalance the dairy substitute.
- Dairy-free tweaks: if dairy is a concern but you want a close approximation, blend a dairy-free cream cheese substitute with a light non-dairy yogurt to echo the tang and creaminess without milk-derived ingredients.
- Sweetness control: if you’re serving guests with a particularly sensitive palate, you can dial back the sweetness of the filling and the swirl by reducing a hint of sugar or using a naturally sweetened fruit syrup for the swirl.
- Flavor enhancements: a whisper of citrus zest in the filling or a pinch of vanilla bean can deepen the aroma and brighten the flavor without altering the core structure.
- Make-it-ahead tricks: these bites are well-suited for chilling ahead of time, then slicing just before serving to maintain clean edges and an appealing presentation.
- Portion play: try making different sizes of bites—tiny minis for a grand dessert display, or a mix of larger pieces for a more generous treat that still feels refined and special.
Storage & Make-Ahead Ideas
One of the biggest joys of bite-sized desserts is their ease of storage and their resilience when prepared in advance. If you’re planning ahead for a party or a busy week, these tips can help you keep them at their best:
- Refrigeration: store the bites in an airtight container, ideally layered with parchment or waxed paper to prevent sticking. They stay freshest when kept chilled and protected from strong odors from other foods.
- Make-ahead timelines: you can prepare the components ahead of time and assemble or swirl closer to serving if you wish. The filling and swirl patterns hold well when refrigerated, so you can plan a day or two in advance for a relaxed setup.
- Freezing: for longer-term make-ahead, freeze individual bites on a tray, then transfer to a freezer-safe container or bag. They retain texture well and thaw relatively quickly at room temperature or in the fridge, maintaining a creamy interior with a bright swirl.
- Freezer-safe presentation: for best results after freezing, allow bites to come to nearly room temperature before serving, then give them a light pat with a clean finger to restore smoothness and sheen on the surface.
- Reheating: if you prefer a slightly warmer finish, you can let frozen bites thaw in the fridge, then give them a quick, gentle warm-up in a low oven or on a warm plate—though most people enjoy them cold or just slightly chilled to maintain the creamy texture.
- Portability: for gatherings, consider packing the bites on a tray layered with parchment to keep them intact during transport. This way, you arrive with a ready-to-serve platter that requires minimal handling at the event.
Fun Facts & Trivia (Optional)
Cheesecake lore is full of delicious anecdotes. Here are a few tidbits that might amuse and inspire:
- Raspberry love: the name raspberry comes from the Latin rubus idea, with “rubus” meaning “bramble bush”—a nod to its wild, vibrant fruit that pairs beautifully with dairy-based desserts.
- Miniaturization trend: turning desserts into bite-sized versions is not just about portion control; it’s about turning a familiar flavor into a playful, shareable experience that invites exploration and conversation.
- Visual poetry: marbled or swirled desserts have long captured the imagination because the patterns celebrate the union of two textures and hues, turning dessert into edible art that’s as pleasing to the eye as to the palate.
- Texture education: the contrast between a crumbly base and a velvety center is a reminder that texture often carries as much flavor as aroma and taste—each bite telling a subtle story of mouthfeel.
Ingredients
Crust
-
– 1 1/2 cups graham cracker crumbs (or digestive biscuit crumbs), finely crushed
→ The crust provides the base and structure for the cheesecake bites. Crush crackers until fine and even, then mix with melted butter (and salt) to form a cohesive, pressable mixture. Press firmly into the bottoms of a mini muffin tin to create a compact shell that holds its shape during baking. For gluten-free versions, use gluten-free crackers or biscuits and ensure they are finely ground for a uniform crust.
– 4 tablespoons unsalted butter, melted and cooled to warm
→ Binds the crust together and adds richness. Use melted butter that has cooled slightly so it doesn’t seize the filling. Combine with crumbs and press evenly into each cup. If you want a crisper crust after baking, prebake the crust for about 5 minutes before adding the filling.
– 2 tablespoons granulated sugar (optional)
→ Adds a touch of sweetness to balance the crackers’ flavor. Mix into the crumb mixture before pressing. If your crackers are already sweet, you can omit this.
– 1/4 teaspoon salt
→ Enhances overall flavor and helps balance sweetness. Distribute evenly through the crust mixture before packing into cups.
Cheesecake Filling
-
– 16 oz (450 g) cream cheese, softened to room temperature
→ Core of the bite, providing the creamy, tangy base. Ensure the cream cheese is fully softened to avoid lumps; beat with sugar until smooth and silky for a glossy texture. Do not overbeat after adding egg to prevent air pockets that can cause cracks.
– 3/4 cup granulated sugar
→ Sweetens the filling and contributes to a smooth, stable texture. Beat with the cream cheese until light and fluffy; overbeating after adding eggs can introduce air and lead to cracking during baking.
– 1 large egg
→ Adds structure and helps the filling set as it bakes. Add the egg after the cheese and sugar are smooth, mixing just until incorporated to maintain a creamy texture and avoid curdling.
– 1/2 teaspoon vanilla extract
→ Adds classic cheesecake aroma and depth of flavor. Use pure vanilla extract for best results; if you have a vanilla bean, scrape seeds for an extra layer of flavor.
– 2 tablespoons sour cream
→ Provides extra tang and creaminess, helping the filling stay moist and smooth. Use full-fat sour cream, cold from the fridge; fold in gently after initial mixing to maintain a velvety texture.
– 1/2 teaspoon lemon zest (optional)
→ Subtle brightness that complements the raspberries. Zest the lemon before juicing; avoid the white pith, which can impart bitterness. Fold zest into the filling with the other ingredients.
Raspberry Swirl
-
– 1 cup fresh raspberries (or thawed frozen)
→ The bright, fruity swirl that contrasts with the creamy filling. Use ripe berries for maximum flavor; refrigerate until needed and gently mash some for texture, leaving a few whole for bursts of color.
– 2 tablespoons granulated sugar
→ Sweetens the raspberries to balance tartness. Adjust to taste depending on the raspberries’ sweetness; mix with raspberries before heating or mashing.
– 1 teaspoon lemon juice
→ Enhances raspberry flavor and provides a bit of acidity to cut through the richness of the cheese. Use freshly squeezed juice and add gradually, tasting as you go.
– 1 teaspoon cornstarch, dissolved in 1 tablespoon cold water (slurry)
→ Thickens the raspberry mixture so the swirl holds its shape during baking. Stir the slurry into the raspberries over low heat until the sauce thickens to a pourable consistency, then cool slightly before swirling into the batter.
Toppings (Optional)
-
– Powdered sugar, for dusting on finished bites
→ A light dusting adds a polished finish and a touch more sweetness. Sift over just before serving to prevent clumping and maintain a delicate appearance.
– Fresh raspberries, for garnish
→ Enhances visual appeal and adds a fresh bite when serving. Select firm berries and wash right before use; pat dry to avoid extra moisture on the bites.
– White chocolate drizzle (optional)
→ Provides a creamy, sweet contrast to the tangy cheesecake. Melt gently in short bursts, then drizzle in a thin, even stream once the bites have cooled; allow the drizzle to set before serving.
Instructions
- Preheat your oven to 325°F (163°C) and prepare a mini muffin tin by lining each cup with paper liners or greasing well for easy release and clean edges.
→ This prevents the delicate cheesecake from sticking and makes removal simple, especially since the bites are small and require intact shells. - Finely crush graham cracker crumbs to 1 1/2 cups using a food processor or by sealing in a bag and pounding with a rolling pin until uniform and powdery.
→ A fine, uniform crumb yields a cohesive crust that grips the filling without crumbly gaps; inconsistent texture can cause the crust to crumble when unmolded. - Combine the crust components by whisking 4 tablespoons melted unsalted butter (cooled to warm), 2 tablespoons granulated sugar (optional), and 1/4 teaspoon salt until the mixture resembles damp sand.
→ The fat from the butter binds the crumbs into a firm shell; salt balances sweetness; warming the butter helps it incorporate smoothly without cooking the sugar. - Press about 1 tablespoon of the crust mixture into each cup of the mini muffin tin, pressing firmly with the back of a spoon or a small flat-bottomed tool to form a compact, even shell.
→ A uniform, tightly packed crust provides structure for the filling and prevents it from sliding or puffing during baking. - If you choose to prebake the crust, bake the shells for 5 minutes at 325°F (163°C), then cool completely before adding the filling.
→ Par-baking helps set the crust so it doesn’t become soggy from the wet filling and ensures a crisp, well-defined base. - Soften 16 oz cream cheese to room temperature and scrape it into a clean bowl, ensuring there are no cold spots that could cause lumps.
→ Softened cream cheese blends smoothly with sugar, yielding a glossy filling; cold or hard cheese will resist mixing and create lumps that are hard to smooth. - Beat the softened cream cheese with 3/4 cup granulated sugar on medium speed until the mixture is light, fluffy, and free of lumps, about 2 to 3 minutes.
→ Proper aeration gives a silky texture and helps the filling set without cracks; scrape the bowl halfway through to maintain even mixing. - With the mixer on low, add 1 large egg and mix just until incorporated, avoiding overbeat to prevent air pockets that can crack during baking.
→ Overmixing introduces air that expands in the oven and cracks the cheesecake; keep to as little mixing as possible once the egg is added. - Beat in 1/2 teaspoon vanilla extract, 2 tablespoons sour cream, and 1/2 teaspoon lemon zest (if using) until the batter is smooth and glossy.
→ Vanilla and sour cream enrich the flavor and texture; lemon zest provides brightness; mix just to blend the ingredients evenly. - Evenly fill each crust with the cheesecake batter to about 2/3 full using a spoon or piping bag for accuracy.
→ Filling to about 2/3 allows room for the raspberry swirl without overflowing, ensuring clean edges after baking. - Prepare the raspberry swirl by combining 1 cup fresh raspberries (or thawed), 2 tablespoons sugar, and 1 teaspoon lemon juice in a small saucepan, then gently mash some berries with the back of a spoon and bring to a light simmer.
→ The raspberries release their juices, creating a vibrant swirl; careful simmering concentrates flavor without turning the fruit into juice. - Mix a teaspoon cornstarch with 1 tablespoon cold water to make a slurry, then whisk the slurry into the raspberry mixture and cook over low heat until the sauce thickens to a pourable but viscous consistency; remove from heat and let cool briefly.
→ The cornstarch thickens the swirl so it holds its shape during baking, producing distinct marbling rather than a runny smear. - Drop a small spoonful of the raspberry sauce onto each cheesecake filling and use a toothpick or skewer to swirl it through the batter in a marbled pattern.
→ Swirling creates an appealing raspberry ribbon that bakes into the bite; avoid over-swirl, which can blend the colors too much. - Bake the assembled bites at 325°F (163°C) for about 14 to 18 minutes, or until the center is just set and the edges are barely tinged with color.
→ The low, steady heat gently sets the filling without cracking; start checking around 14 minutes to avoid overbaking, which makes the texture dry. - Cool the pan on a wire rack for 15 minutes, then carefully transfer the bites to the rack to cool completely, and refrigerate for at least 2 hours to fully set.
→ Cooling at room temperature prevents sudden temperature shock that could cause cracking, and chilling ensures clean, firm bites for slicing or biting. - Before serving, dust with powdered sugar, garnish with fresh raspberries, and, if desired, drizzle white chocolate in a thin, even line over the tops once they are completely cool.
→ Powdered sugar adds a polished finish; fresh raspberries enhance color and aroma; white chocolate drizzle provides a sweet contrast that sets as it cools.

Notes
These gluten-free raspberry swirl cheesecake bites are creamy, tangy, and have a crisp crust that you press into mini muffin cups. For the gluten-free version, use finely ground gluten-free crackers or digestive biscuits and, if your crackers are already sweet, you can skip the optional crust sugar. Prebake the crust for about 5 minutes to help keep it crisp after baking. The filling comes together by beating softened cream cheese with granulated sugar until smooth, then adding the egg, vanilla, sour cream, and, if using, lemon zest; mix until just combined to maintain a silky texture and avoid cracks. The raspberry swirl is created by simmering raspberries with sugar and lemon juice, thickened with a cornstarch slurry, then cooled slightly before swirling into the batter. Bake in mini muffin cups as directed, then chill the bites until set (2–4 hours or overnight) for clean removal. Finish with a light dusting of powdered sugar, a few fresh raspberries, or a white chocolate drizzle if desired. These bites store well in the fridge for several days and freeze well for make-ahead meals. When serving, let them come to room temperature for better creaminess and flavor, and remember to confirm all ingredients are gluten-free if you have gluten intolerance.
Tips
Tips for Perfect Raspberry Swirl Cheesecake Bites
Crust tips
- Use a food processor to grind graham crackers (or digestive biscuits) into ultra-fine crumbs for a smooth, cohesive crust. If you don’t have a processor, seal the crackers in a bag and crush with a rolling pin until very fine.
- Mix the crumbs with melted butter and a pinch of salt until the mixture just clumps when pressed. If the crust feels dry, add a teaspoon more melted butter or a splash of water to bring it together.
- Press the crust firmly into the bottoms and slightly up the sides of each mini muffin cup. Use the flat bottom of a small glass or measuring spoon to achieve an even, compact shell without air pockets.
- Chill the crust for 10–15 minutes before baking to help it set. For a crisper crust, prebake for 4–5 minutes, then cool completely before adding the filling.
- To keep gluten-free crust cohesive, use finely ground gluten-free crackers and ensure they’re ground evenly; the same butter-to-cracker ratio works well.
Cheesecake filling tips
- Let cream cheese sit at room temperature until very soft, then beat until smooth and creamy to avoid lumps. Check for any remaining lumps before adding sugar.
- Beat the sugar with the cream cheese until light and airy, but stop as soon as you reach a glossy texture. Overbeating after the egg is added can introduce air and cause cracks.
- Add the egg on its own step, mixing just until incorporated. Overmixing after the egg goes in can create air pockets that lead to cracks during baking.
- Scrape the bowl and add vanilla, lemon zest (if using), and sour cream. Fold gently to maintain a silky texture without deflating the mixture.
- Room-temperature eggs mix more smoothly into the batter. If your eggs are cold, warm them in a bowl of warm water for a few minutes before adding.
- Maintain the batter’s thickness; if it seems too loose, refrigerate 15–20 minutes before filling the cups to help prevent spreading.
Raspberry swirl tips
- Use ripe raspberries for vibrant flavor and color. Fresh berries yield a brighter swirl; thawed berries work too—just drain excess liquid to avoid thinning the batter.
- Cook the raspberries with sugar and lemon juice just enough to release juice and create a loose sauce. Stir in the cornstarch slurry and simmer until the mixture thickens to a pourable but not runny consistency. Cool completely before swirling.
- For defined swirls, lightly mash some berries and leave a few whole for color bursts. Spoon dollops of the raspberry sauce onto the filled batter and swirl with a skewer or knife in a gentle figure-8 pattern.
- Allow the swirl to cool slightly before mixing into the batter if you’re swirling into warm batter; this helps maintain distinct patterns and prevents the swirl from blending too much.
- If you prefer a stronger raspberry flavor, reduce the sauce slightly and brush a tiny amount of it onto the top of the batter just before baking—avoid overloading, which can cause pooling.
Toppings tips
- Dust with powdered sugar just before serving to keep the appearance light and prevent clumping.
- Garnish with fresh raspberries close to serving time to maintain firmness and prevent sogginess from moisture.
- White chocolate drizzle adds contrast and sweetness. Melt in short bursts on low heat, stirring constantly, and drizzle onto cooled bites. Let the chocolate set completely before serving.
Storage and troubleshooting tips
- Keep the bites refrigerated in an airtight container. They are best served chilled and hold their shape when cold.
- Store in the fridge for up to 5 days; freeze for longer storage (1–2 months). Wrap well to prevent freezer burn and thaw in the fridge before serving.
- Common cracks can come from overbaking or rapid temperature changes. Bake until the centers just jiggle and finish with some residual warmth off the oven, then cool gradually in the pan.
- If you notice the crust pulling away or the filling cracking after chilling, a light fruit glaze or additional swirls on top can hide imperfections and still taste fantastic.
FAQ
What ingredients do I need for Homemade Raspberry Swirl Cheesecake Bites?
- Crust: 1 1/2 cups graham cracker crumbs, 3 tablespoons granulated sugar, 4 tablespoons unsalted butter (melted), pinch of salt (optional).
- Cheesecake filling: 8 ounces cream cheese (softened), 1/3 cup granulated sugar, 1 teaspoon vanilla extract, 1 large egg, 2 tablespoons sour cream or plain yogurt (optional), pinch of salt.
- Raspberry swirl: 2 tablespoons raspberry jam or preserves (or puree 1/4 cup fresh raspberries with 1 teaspoon sugar), 1–2 teaspoons water to loosen jam if needed.
- Optional garnish: fresh raspberries, grated chocolate, or a light dusting of powdered sugar.
What equipment will I need to make these bites?
- Mini muffin tin (12 cups) or silicone mini muffin cups, with liners.
- Mixing bowls, electric mixer or sturdy whisk, spatula.
- Measuring spoons and cups, toothpicks or small skewer for swirling.
- Cooling rack and an airtight container for storage.
How do I prepare the crust?
- Preheat oven to 325°F (165°C). Line the muffin tin with liners.
- Combine graham cracker crumbs, sugar, and a pinch of salt in a bowl. Stir in melted butter until the mixture resembles wet sand.
- Divvy the crust mixture into each muffin cup (about 1 tablespoon per cup). Press down firmly with the back of a spoon or a small glass to form a compact crust.
- Chill the crust in the freezer for 8–10 minutes to set before filling.
How do I make the cheesecake filling?
- Beat the cream cheese with the sugar and a pinch of salt until very smooth and creamy (about 1–2 minutes).
- Beat in vanilla. Add the egg and mix on low speed just until combined; avoid overmixing.
- Stir in sour cream or yogurt, if using, until the mixture is smooth and uniform.
How do I create the raspberry swirl?
- Divide the filling evenly among the cups, filling each about 2/3 full.
- Drop 1 small dollop (about 1/2–1 teaspoon) of jam onto the top of the filling in each cup. You can also use a raspberry puree.
- Gently swirl the jam into the filling with a toothpick or skewer to create ribbons.
How long and at what temperature should I bake them, and how do I chill them?
- Bake at 325°F (165°C) for 14–16 minutes, or until the edges are set and centers are slightly jiggle-y.
- Cool the pan on a rack for 15–20 minutes, then refrigerate and chill for at least 3–4 hours or overnight until firm.
How should I serve and store the bites?
- Remove from the muffin tin and store in an airtight container, with parchment between layers, in the fridge for up to 4–5 days.
- For longer storage, freeze the bites on a sheet pan for 1–2 hours, then transfer to a freezer-safe bag. They keep about 2–3 months. Thaw in the fridge overnight before serving.
- Garnish with fresh raspberries or a light dusting of powdered sugar when serving.
Can I make these bites ahead for parties or holidays?
Yes. They’re best served chilled. You can prepare crusts and fillings ahead, assemble and bake the day you plan to serve, or freeze assembled bites (unbaked) and bake from frozen (add a few extra minutes to the bake time). Ensure they are fully set before storing.
Can I customize flavors or use substitutes for dairy or gluten?
Yes. Here are some ideas:
- Gluten-free: use gluten-free graham cracker crumbs or finely crushed digestive biscuits with a touch more butter as needed.
- Dairy-free: use dairy-free cream cheese and a dairy-free butter substitute; texture may vary slightly.
- Flavor variations: swap in strawberry, blueberry, or lemon curd for different swirl flavors; add chocolate chips to the filling for a mocha twist.
What should I do if the bites crack or sink in the middle?
- Cracks: avoid overmixing; bake until the center is just set and edges are firm. A few tiny cracks are common but can be minimized with careful mixing.
- Sinking centers: don’t overfill cups—about 2/3 full is ideal. Try not to open the oven during the first half of baking. If using a water bath, keep water level modest and not touching the tins.