Introduction / Hook
There’s a certain cozy magic in watching a tray of puffed crescents emerge from the oven, their golden edges curling with confidence around a cloud of silken cheesecake filling. The first bite is a whisper-soft reveal: a tender, lightly blistered crescent giving way to a creamy, tangy center that tastes like a miniature cheesecake wearing a warm, buttery coat. The aroma alone—cream cheese mingling with vanilla, a hint of citrus, and a kiss of caramelized sugar—is enough to summon a carefree smile, as if you’d just stumbled onto a tiny, delicious secret. Cheesecake Crescent Rolls are more than a dessert or an appetizer; they’re a portable moment of indulgence that fits in the palm of your hand and in the rhythm of any occasion. Whether you’re hosting a brunch, catering a party, or simply treating yourself after a long day, these little wonders offer comfort, elegance, and a touch of whimsy all at once.
What makes them so compelling is their delightful balance: a light, flaky exterior that crackles softly when you bite, paired with a creamy center that’s both indulgent and accessible. No matter the season, they feel celebratory—like a tiny, edible handshake that says, “Let’s enjoy this moment together.” And because they’re inherently versatile, you can tailor the flavor to your mood, the occasion, or the ingredients you have on hand. In short, Cheesecake Crescent Rolls are a smart, satisfying way to bring the magic of a classic cheesecake into a playful, shareable format.
The Story Behind the Dish
Cheesecake Crescent Rolls are a modern twist on two timeless, beloved concepts: the crescent roll and the cheesecake. Crescent rolls, with their origin in the early 20th century, became a staple of quick, friendly baking—soft, flaky layers that whisper of Sunday breakfasts and picnic baskets. Cheesecake, meanwhile, traces a longer, richer lineage through cuisines around the world, from ancient Greek traditions to the indulgent New York style that has become a symbol of comfort and celebration. The marriage of these two ideas feels almost inevitable: a familiar, joyful dough that embraces a luxurious, tangy filling. The result is both comfort food and a celebration in miniature, a dish that can traverse casual weeknights and more festive gatherings with the same warm charm.
In many homes, the crescent roll is a trusted canvas for creativity—rolled around savory fillings, sprinkled with cinnamon sugar, or tucked with fruit jams. Pair that with the universal appeal of cheesecake—a creamy, slightly tart center that pairs beautifully with citrus, vanilla, and a touch of sweetness—and you have a dish that resonates across generations. The idea behind Cheesecake Crescent Rolls is simple: take the ease and crowd-pleasing appeal of crescent rolls, elevate them with a creamy cheesecake filling, and present them as a handheld bite that feels special without demanding a parade of ingredients or hours in the kitchen. It’s a small, sunlit idea that travels well, making it perfect for brunch buffets, potlucks, school events, or a cozy night at home when you want something a little luxurious yet undeniably approachable.
There’s also something nostalgic in these bites—the way the dough’s gentle rise echoes the warmth of a conversation, the way the filling’s tang cuts through sweetness like a familiar companion who knows just when to say “let’s enjoy this.” The result is a dish that invites sharing, conversation, and a sense of culinary play. It’s not about technique alone; it’s about the experience—the way a single bite can transport you to a sunlit bakery, a family kitchen at holiday time, or a spontaneous celebration with friends gathered around a plateful of gold-crusted crescents.
Why You’ll Love This Recipe
- Quick and comforting: a smart shortcut that delivers a bakery-worthy treat in a fraction of the time.
- Crowd-pleasing versatility: works as a party appetizer, a fancy brunch addition, or a sweet finish after a casual dinner.
- Luxurious texture with everyday simplicity: flaky pastry on the outside and a creamy, smooth center inside.
- Make-ahead friendly: you can prepare elements ahead of time and assemble just before baking.
- Customizable flavors: easily adapt with citrus zest, chocolate, berries, or spice to suit the season or mood.
- Kid-friendly charm: familiar flavors and gentle sweetness make them a hit with younger guests and adults alike.
- Portion-perfect: bite-sized portions factor into easy grazing menus or playful dessert plates.
In essence, these rolls deliver a little bit of celebration with the ease of a familiar favorite. They reward with every bite, encouraging you to dip, bite, and repeat—and perhaps to experiment with a playful twist next time you bake them. Whether you’re new to fancy-looking desserts or a seasoned host who loves a simple showstopper, Cheesecake Crescent Rolls offer a reliable, uplifting experience that never feels over-the-top.
Flavor Profile & Texture
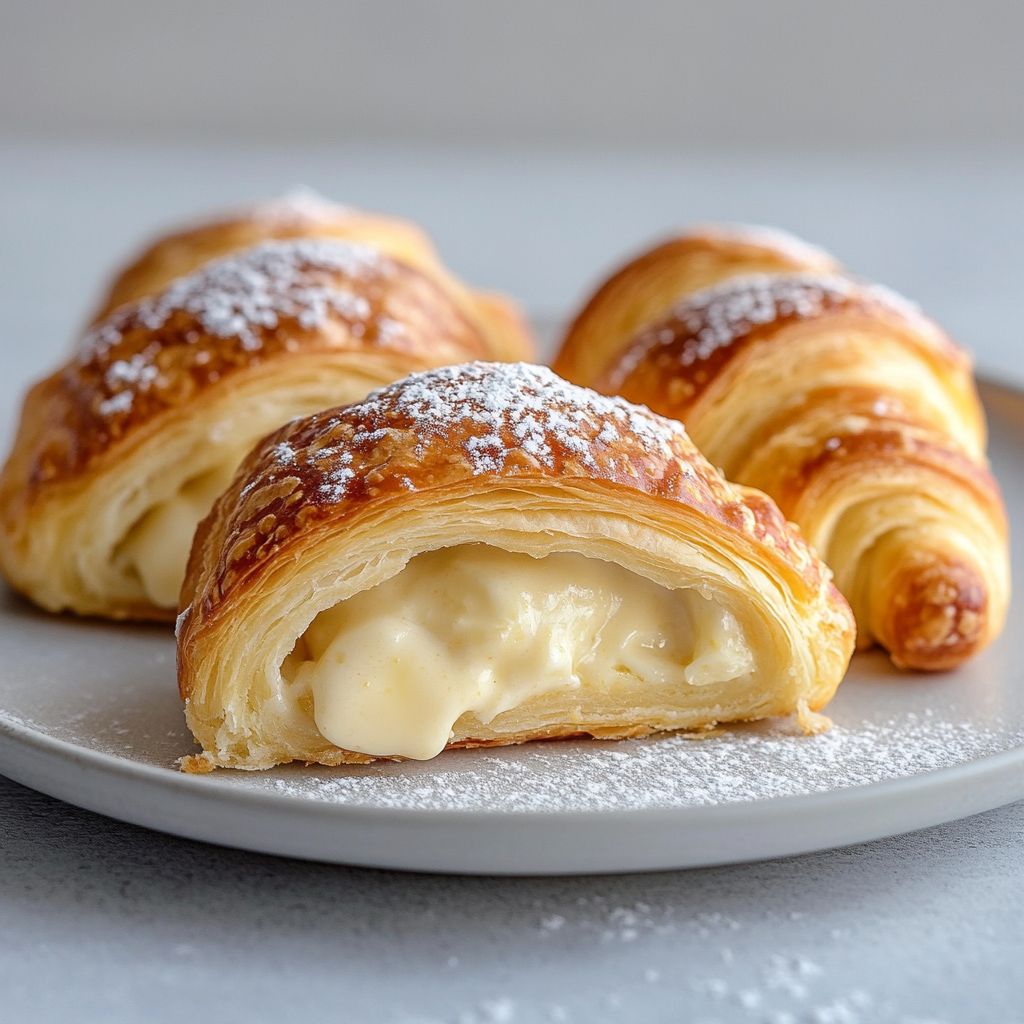
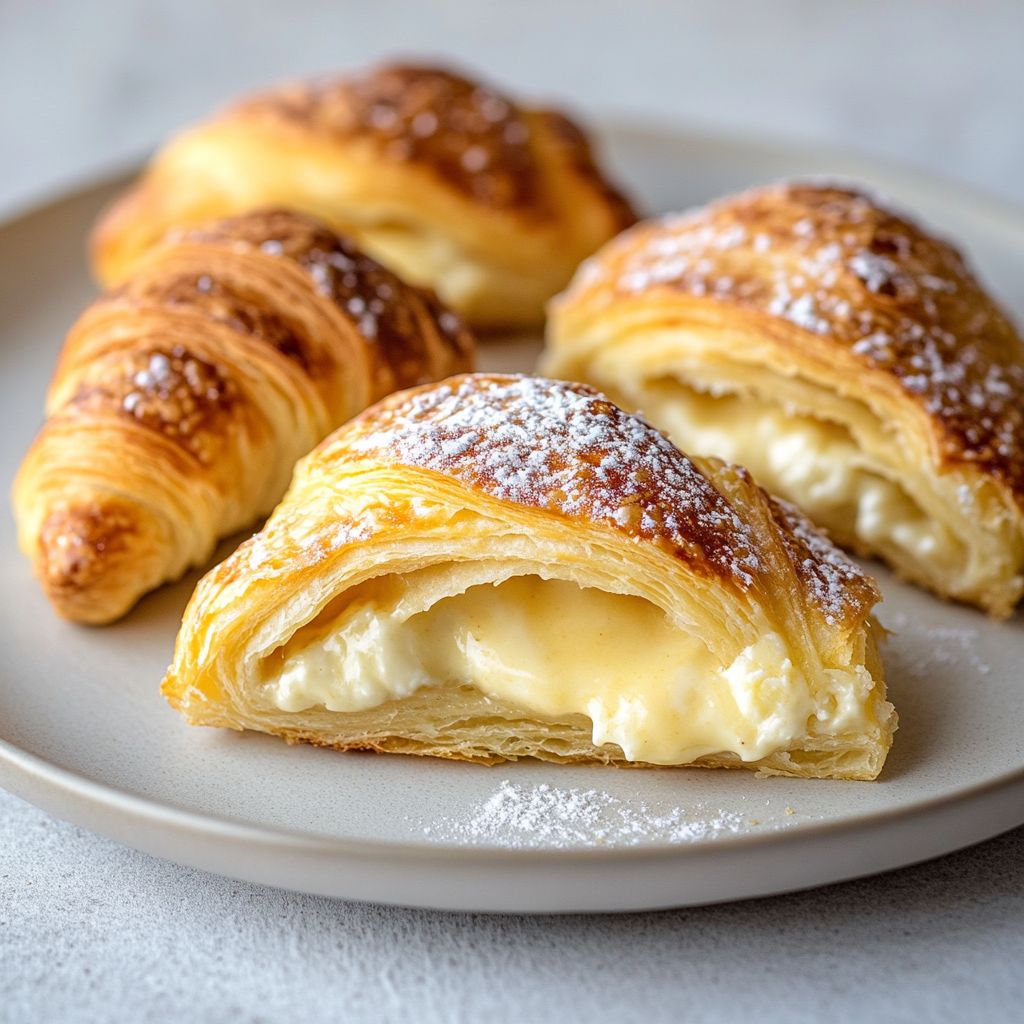
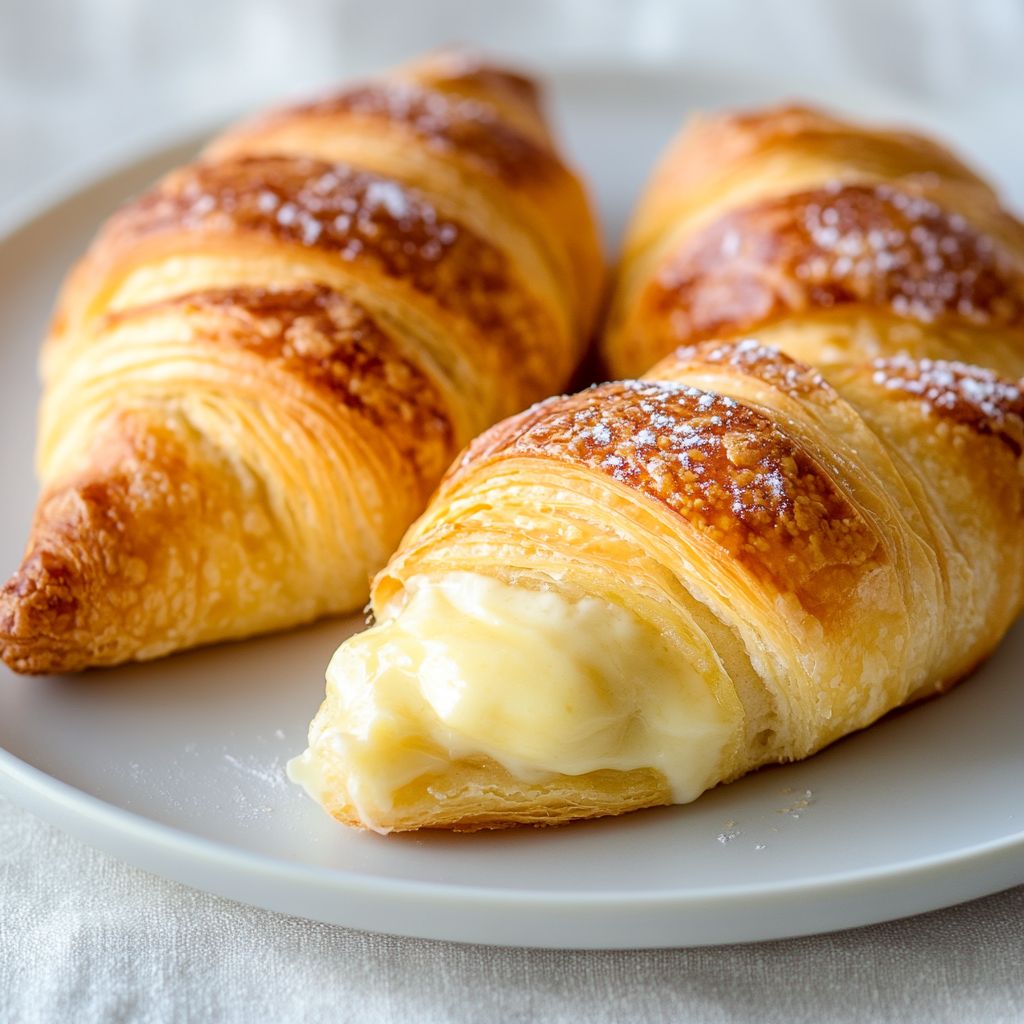
The flavor profile is a delicate conversation between tangy cream cheese, vanilla-sweetened richness, and the toasty, buttery crescent exterior. The cream cheese filling carries a gentle acidity that cuts through sweetness, providing balance that keeps the bite sophisticated rather than cloying. A whisper of lemon zest or a trace of almond adds a bright note that lifts the palate and brightens the overall impression. The crescent dough itself provides a flaky, tender texture with a light crunch at the edges, creating a satisfying contrast to the creamy center. When warm, the filling becomes luxuriously smooth, almost dreamy, while the outer shell maintains its structure, offering a satisfying bite and a slight resistance before giving way to that creamy heart.
Tactilely, you’ll experience a dance between crisp edges and soft, pillowy interiors. The top surfaces may glisten with a subtle glaze or a dusting of powdered sugar, catching the eye with a tiny gleam that promises sweetness without shouting. ароматically, the dish releases a comforting blend of dairy richness, vanilla, and caramelized dough, with hints of citrus that awaken the senses just as the first bite lands. The overall mouthfeel is indulgent yet approachable, a balance that makes each roll feel as if it’s worth savoring slowly, even as you crave the next one. This is dessert comfort with a twist—a familiar, well-loved format reimagined as a playful, handheld treat.
Occasions & Pairings
These rolls shine at a wide range of occasions, from quiet mornings to lively gatherings. They’re ideal for a brunch buffet, where their airy interior and elegant warmth shine against berries, yogurt, or a sparkling beverage. They work beautifully as an hors d’oeuvre at parties, where their compact size invites easy passing and sharing. They also fit well into a holiday dessert spread, offering a comforting alternative to richer cakes while still feeling festive. For weeknights, they bring a touch of celebration to a simple dinner, turning leftovers or pantry staples into something special after the kids are tucked in or guests arrive late.
Pairings that elevate these rolls include:
- Beverages: a light sparkling wine, a mimosa, a late-harvest tea, or a cappuccino makes a harmonious match with the creamy center and flaky crust.
- Fruit accents: fresh berries, a drizzle of berry coulis, or a compote can provide bright, fruity contrast to the cheesecake filling.
- Accompaniments: a dollop of whipped cream, a splash of citrus glaze, or a dusting of cinnamon or powdered sugar can enhance aroma and visual appeal.
- Side dishes: a lightly dressed greens salad or a small fruit salad can balance the richness and add a refreshing note to the plate.
Seasonal variations make them especially charming. In spring, a hint of citrus and a scattering of fresh berries accentuates the bright flavors. In autumn and winter, a touch of vanilla and nutmeg with caramelized edges evokes warm, cozy moments. For festive occasions, consider a gold-dust finish or a light glaze that catches the light, turning each roll into a tiny, edible celebration.
Tips, Variations & Substitutions
- Vegan or dairy-free option: use a cream cheese substitute that mirrors the tang and texture, and opt for crescent dough that’s dairy-free if available. Consider adding a touch of dairy-free butter to the exterior for a similar flavor and a crisp finish.
- Gluten-free approach: seek gluten-free crescent dough or use sheeted gluten-free pastry cut into triangles, then shape as directed. Be mindful of cross-contamination if serving guests with gluten sensitivities.
- Flavor twists: swap in lemon or orange zest for a bright citrus note, or fold in finely grated chocolate for a subtle decadence. A pinch of espresso powder can enhance the cream cheese’s depth for a mocha-like kiss.
- Texture play: brush the baked rolls with a light syrup or glaze that includes vanilla, citrus zest, or almond extract to deepen aroma and add a gentle sheen.
- Fruit-forward version: add a small spoonful of fruit preserves tucked around the filling before folding the dough for a fruity aroma and color pop inside each bite (avoid overwhelming the filling’s balance).
- Make-ahead ideas: prepare the filling and dough portions ahead, refrigerate, and assemble just before baking to keep the texture light and flaky. If you’re making ahead for a party, bake the rolls and rewarm gently before serving to recapture the softness of the interior.
- Texture variations: for a crisper finish, bake a few minutes longer or place the rolls on a rack toward the top of the oven. If you prefer a softer bite, reduce bake time slightly and allow a touch more residual warmth to soften the center.
Storage & Make-Ahead Ideas
Leftovers, if you’re fortunate enough to have any, store best in the refrigerator in an airtight container for up to 2–3 days. Reheating is simple: warm gently in a toaster oven or conventional oven until the exterior edges regain their crispness and the center looks irresistibly creamy. Avoid microwaving for too long, as it can soften the outer crust and dull the flaky texture that gives these rolls their charm. If you’d like to prep ahead, consider combining the prepared dough triangles with a ready-to-fill cheesecake center and refrigerating them on a parchment-lined tray. When you’re ready to bake, transfer them to the oven straight from the fridge; the chill will slightly slow the rise, producing a dramatic, beautiful puff once they meet heat.
Freezing options exist for both pre-assembled and fully baked versions. For unbaked, filled crescents, freeze on a tray before transfer to a bag; bake from frozen, adding a few extra minutes as needed. For baked rolls, once fully cooled, wrap individually in parchment and then place in an airtight container or freezer bag. Reheat gently to preserve their delicate texture and prevent the filling from seeping or losing its airiness.
Fun Facts & Trivia (Optional)
Did you know that crescent rolls, as a product, owe much of their iconic shape and texture to the way dough is layered and rolled? The crescent form is not just a cute shape; it’s a clever technique that grants each bite multiple layers of tenderness. Cream cheese, a central player in these rolls, was first created in the United States in the 1870s, and it quickly became a cornerstone of many beloved desserts and spreads. The combination of these two elements—flaky, buttery dough and a silky, tangy filling—embodies a quintessentially American approach to dessert: comfort, efficiency, and a touch of indulgence that feels both familiar and fresh. The playful nature of pairing a classic cheesecake with a handheld pastry also speaks to the evolving palate of home cooks who love recreating bakery-style treats with a friendly, approachable twist.
In many ways, Cheesecake Crescent Rolls capture a broader trend in modern cooking: taking beloved, classic flavors and reimagining them into versatile, shareable formats. This approach honors tradition while inviting creativity—an edible reminder that a dish can be simple yet sophisticated, modest yet memorable, and most importantly, made for easy sharing with those you care about.
Ingredients
Cheesecake Crescent Rolls
- 2 cans refrigerated crescent roll dough (8-count each)
→ The outer pastry that encloses the cheesecake filling. Keep the dough cold and handle it gently, separating the triangles from each can without stretching too much. Place the filled crescents seam-side down on a parchment-lined baking sheet and bake at 350°F (175°C) until golden, about 12–15 minutes. Seal any small gaps by pinching the perforations together to prevent filling from leaking out during baking. - 8 oz cream cheese, softened
→ Core of the cheesecake filling; use full-fat cream cheese for best flavor and a smooth, creamy texture. Allow to come to room temperature, then beat until completely smooth with no lumps. This base gives a tangy, rich filling that contrasts with the sweet dough. - 1/4 cup granulated sugar
→ Provides gentle sweetness to balance the tang of the cream cheese. Beat it with the cream cheese until fully incorporated and fluffy. If you prefer a sweeter filling, you can increase by 1–2 tablespoons, but start with this amount for a classic cheesecake flavor. - 1 teaspoon pure vanilla extract
→ Enhances the depth and roundness of the filling’s flavor. Use high-quality pure vanilla rather than imitation for best aroma and sweetness. Add to the cream cheese mixture and beat until integrated for a smooth, fragrant filling. - 1 tablespoon lemon juice or 1 teaspoon lemon zest (optional)
→ Adds brightness and a subtle tang that echoes traditional cheesecake. Lemon zest provides aroma and flavor without thinning the filling; lemon juice offers a lighter tang but can thin the mixture, so use sparingly. If using juice, whisk in gradually. - 1 tablespoon sour cream or heavy cream (optional)
→ Keeps the filling silky and slightly lighter in texture. Full-fat dairy works best for richness; fold in gently after beating the cream cheese and sugar until smooth. If omitted, the filling will still set but may be a touch firmer. - Pinch of salt (optional)
→ A tiny amount enhances sweetness and sharpens the tang of the cream cheese. Use only a pinch to avoid oversalting the filling.
- 1 large egg, beaten with 1 tablespoon water (egg wash) to brush on dough before baking for golden color (optional)
→ An egg wash gives the rolls a glossy, evenly browned finish and helps seal seams. Brush lightly just before baking; avoid over-wetting the dough to prevent sogginess. If you skip this, the rolls will still bake nicely but with less shine.
- 2 tablespoons melted butter (for brushing the hot rolls)
→ Adds rich flavor and helps keep the pastry tender after baking. Brush on the rolls as soon as they come out of the oven to melt into the pastry, or gently rewarm and brush for extra gloss. If you prefer, drizzle a tiny bit of honey into the butter for a sweeter finish. - Powdered sugar for dusting (optional)
→ A light dusting on cooled rolls adds a touch of sweetness and a decorative finish. Best applied after the rolls have cooled slightly to prevent clumping and uneven coverage. If you’re serving with a glaze, dusting is optional or can be omitted. - Glaze (optional): 1/2 cup powdered sugar + 1–2 tsp milk, whisked until smooth
→ A simple drizzle glaze that complements the creamy filling. Adjust consistency with a little more milk for a thin drizzle or a bit less for a thicker glaze. Add a splash of vanilla or lemon juice for extra flavor. Drizzle after the rolls have cooled to prevent running.
Instructions
- Preheat your oven to 350°F (175°C) and line a large baking sheet with parchment paper or generously grease it with nonstick spray so the crescents lift cleanly after baking.
→ A proper preheat ensures the dough sets at the right temperature on contact, while parchment or greasing prevents sticking and makes removal easy without tearing the delicate pastry. - Open both cans and separate the dough into 16 individual crescent triangles, keeping the dough cold and handling it gently to avoid tearing or stretching; keep the perforations intact as you work.
→ Cold dough yields neater layers and helps the filling stay contained; avoid stretching the dough to prevent thin spots that can leak during baking. - In a medium bowl, soften the cream cheese to room temperature, then beat until completely smooth with no lumps; this creates a velvety filling that distributes evenly when baked.
→ Softened cream cheese blends fully with sugar and flavorings, preventing lumps and ensuring a creamy, cheesecake-like texture in every bite. - Add granulated sugar to the cream cheese and beat until fully incorporated and fluffy, followed by the vanilla extract; this builds the classic cheesecake sweetness and depth of flavor.
→ Beating air into the mixture lightens the filling so it doesn’t become heavy; proper vanilla distribution yields a rounded aroma without overpowering tang. - If desired, whisk in lemon zest or lemon juice gradually and, if using, optional sour cream or heavy cream, then season with a pinch of salt; adjust brightness and creaminess without thinning the mixture excessively.
→ Lemon zest provides aroma and a subtle tang; lemon juice adds brightness but can thin the filling, so add little by little while checking texture. Sour cream or heavy cream adds silky texture and prevents the filing from being too stiff. - Using a small spoon or spatula, place a modest amount of filling at the wide end of each crescent triangle, taking care not to overfill which could cause leakage.
→ A generous but careful amount ensures a creamy center without oozing; overfilling strains the dough and can split seams during rolling. - Starting at the wide end, roll the dough toward the tip to form a classic crescent, pinch the seam to seal and press the perforations closed so the filling cannot escape during baking.
→ Rolling helps encase the filling securely; sealing seams and perforations prevents gaps that could leak cheese during heat exposure and ensures a neat appearance. - Transfer the formed crescents to the prepared sheet with the seam-side down, leaving about 1 inch of space between each piece for expansion during baking.
→ Spacing allows heat to circulate around each pastry for even browning and prevents sticking or merging of neighboring crescents. - If you are using an egg wash, whisk a large egg with 1 tablespoon water and lightly brush the tops of the crescents just before baking to promote an even, glossy golden crust; avoid soaking the dough to prevent sogginess.
→ The egg wash sets up a delicate sheen and helps the dough achieve a uniform color, while a light application avoids soggy surfaces that can dull crust texture. - Bake the crescents in the preheated oven for 12–15 minutes, rotating the pan halfway if your oven runs hot or unevenly, until the tops are deep golden and the filling looks set.
→ Turning helps achieve even browning, and the 12–15 minute window prevents undercooking the centers or overbrowning the edges; the filling should appear set and not jiggly when lightly touched. - Remove the baking sheet and allow the crescents to cool on a wire rack for 5–10 minutes so the centers finish setting and the pastry firms up enough to handle.
→ Resting prevents the hot filling from slipping out and helps achieve a stable texture for handling and any finishing glaze. - Brush the hot rolls with melted butter, allowing it to melt into the pastry for added richness and a tender crumb after baking; this also helps the tops stay moist and shiny.
→ Butter on hot pastries melts into the crust, enhancing flavor and creating a slight gloss typical of bakery-quality crescents. - Dust with powdered sugar if desired, or prepare a glaze by whisking 1/2 cup powdered sugar with 1–2 teaspoons milk until smooth, then drizzle once the rolls have cooled to your preferred temperature.
→ The sugar dust or glaze adds a finishing sweetness and moisture balance; wait until the rolls are cooled enough that the glaze sets without sliding off.
Notes
These cheesecake crescent rolls are a delicious balance of tangy, creamy filling and flaky, buttery dough. Keep the crescent dough cold and handle it gently, separating the triangles from each can without stretching too much, and seal seams well to prevent filling from leaking during baking. For the filling, use 8 oz cream cheese softened to room temperature, 1/4 cup granulated sugar, and 1 teaspoon pure vanilla extract; beat until completely smooth and fluffy. If using optional brightness, fold in 1 tablespoon lemon juice or 1 teaspoon lemon zest, and for extra silkiness you can add 1 tablespoon sour cream or heavy cream. A pinch of salt enhances flavor. Roll a generous spoonful of filling inside each dough triangle, pinch to seal, and place seam-side down on a parchment-lined sheet. Brush the tops with an egg wash (1 large egg beaten with 1 tablespoon water) for golden color, and bake at 350°F (175°C) for 12–15 minutes until golden. If you like, brush hot rolls with 2 tablespoons melted butter and dust with powdered sugar once cooled, or whisk together a glaze of 1/2 cup powdered sugar with 1–2 teaspoons milk for a light drizzle. These rolls are best served warm but will keep in an airtight container for a day or two; reheat gently to refresh the texture. For make-ahead, refrigerate assembled rolls on the baking sheet for up to 24 hours before baking. Always ensure your cream cheese is fresh and soft for the smoothest filling, and use high-quality vanilla for depth of flavor.
Tips
- Keep the crescent dough cold until you’re ready to use it. Cold dough yields flakier layers and less sticking. If the dough becomes warm, chill it for a few minutes before proceeding.
- When separating crescent triangles, handle gently and avoid stretching. If the perforations tear, pinch them closed to prevent filling from leaking during baking.
- Work on parchment or a silicone sheet to prevent sticking. Lightly flour the surface only if needed; too much flour can dry the dough and weaken the seams.
- Use softened, room-temperature cream cheese for a smooth, lump-free filling. Beat until completely creamy before adding sugar—this helps achieve a silky texture rather than a dense mass.
- Gradually beat in sugar to avoid gritty texture. If you like a sweeter filling, increase sugar by 1–2 tablespoons, but start with the specified amount for classic cheesecake flavor.
- For brightness, add lemon zest rather than juice when possible. Zest provides aroma without thinning the filling; if you use juice, whisk in sparingly to maintain thickness.
- Add a pinch of salt to balance sweetness and enhance the cheesecake tang. A little salt goes a long way—don’t skip it, but keep it minimal.
- If using sour cream or heavy cream, fold in gently after beating the cream cheese and sugar to preserve a smooth texture and prevent the filling from becoming too runny.
- Use a light egg wash (egg beaten with water) to brush on the dough just before baking. This helps seal seams and gives a glossy, golden finish. Apply sparingly to avoid soggy dough.
- Brush the rolls with melted butter after they come out of the oven to lock in moisture and add shine. If you prefer a crisper shell, consider brushing with a light glaze of butter instead.
- When assembling, don’t overfill the crescents. A small amount of filling near the wide end yields a neater roll and less leakage during baking.
- Place filled crescents seam-side down on the baking sheet for best shape retention and easier sealing. If a seam opens slightly, press gently to seal while the dough is still warm from shaping.
- For a glossy finish and finer glaze, let the baked rolls cool 5–10 minutes before glazing. This helps the glaze cling rather than sliding off a hot surface.
- Dust with powdered sugar once the rolls have cooled slightly, or drizzle with the glaze once fully cooled if you prefer a sharper sweetness.
- Make-ahead option: Assemble and refrigerate unbaked crescents on parchment for up to 24 hours. Brush with egg wash and bake from the fridge, adding 1–2 minutes to the bake time if needed.
- Freezing tips: Freeze unbaked rolled crescents on a parchment-lined sheet, then transfer to a bag. Bake from frozen, adding 2–3 minutes to the bake time. For baked leftovers, store in an airtight container up to 2 days and rewarm gently.
FAQ
What are Cheesecake Crescent Rolls?
Cheesecake Crescent Rolls are a quick, easy dessert made by filling crescent roll dough with a smooth cream cheese filling, rolling them up, and baking until golden. They’re often finished with a light glaze or dusting of powdered sugar.
What ingredients do I need?
For the filling: softened cream cheese, granulated sugar, vanilla extract, and optional lemon zest or a splash of lemon juice. For the dough: store-bought crescent roll dough. Optional toppings include melted butter for brushing, powdered sugar for dusting, or a simple glaze (powdered sugar with milk or water).
Can I use store-bought crescent dough?
Yes. Using store-bought crescent dough is common and convenient. Separate the dough into triangles, place a small amount of filling at the wide end, roll up, seal, and bake as directed.
How do I assemble and fill them?
Beat the cream cheese with sugar and vanilla until smooth. Place about 1 tablespoon of filling on the wide end of each dough triangle, roll toward the tip to form a crescent, and pinch the seams to seal. Place seam-side down on a baking sheet.
What are the baking time and temperature?
Preheat to 375°F (190°C). Bake the rolls for about 12–15 minutes, until the edges are golden and the filling is set. Let them cool slightly before serving.
How can I prevent the filling from leaking or cracking?
Use softened cream cheese and don’t overfill the triangles. Chill the filling briefly if it’s very soft, and seal the seams well. Avoid overbaking, which can cause cracking.
What variations can I try?
Try lemon-zest or lemon-juice in the filling for brightness; fold in mini chocolate chips; swirl in Nutella; add a berry compote or a sprinkle of cinnamon sugar before rolling; finish with a glaze or powdered sugar.
How should I store and can I freeze them?
Store baked rolls in the refrigerator for 2–3 days. Reheat gently in the oven or microwave. For freezing, freeze unbaked assembled rolls on a tray, then transfer to a bag for up to 1–2 months; bake from frozen, adding 5–7 minutes. Baked rolls can also be frozen and reheated.
Are there dairy-free or gluten-free options?
Yes. Use dairy-free cream cheese and a dairy-free butter substitute if desired. If you need gluten-free, choose a gluten-free crescent dough (check labels) or a gluten-free pastry alternative; note texture may differ slightly.