Introduction / Hook
Imagine a single bite that wraps you in a warm, velvet-black night of chocolate, then suddenly reveals a sunlit, creamy heart of peanut butter. The aroma alone is a small celebration: cocoa dust drifting through the air, a whisper of vanilla, a hint of roasted peanut that makes your mouth water long before you taste. Cioccolato Burro Arachidi is not merely a dessert; it’s an invitation to slow down, to savor, to share. It’s the kind of treat that sits at the intersection of comfort and celebration, where the familiar meets the sublime in a way that makes you smile with your eyes closed and your senses fully listening. Whether you’re curling up with a mug of coffee on a rainy afternoon, plating a show-stopping finish for guests, or giving a homemade gift that feels like a warm hug wrapped in glossy chocolate, this indulgence speaks the language of joy without saying a word.
In the kitchen, flavors are memories in disguise. The chocolate here isn’t just sweet; it’s a storyteller. It carries the dusky richness of a well-tempered bar, the subtle bitterness that keeps it honest, and a luxurious gloss that catches the light in the best possible way. The peanut butter, whether silky or a touch nubbly, lends creaminess and a gentle saltiness that makes the chocolate seem even more chocolatey. Together, they fuse into a texture that can be soft and creamy, with a surprising snap on the first bite, a line of sesame-like sparkle from salt crystals, and perhaps a little crunch if you choose to fold in roasted nuts or crunchy bits. The experience is multi-sensory: you’ll hear a quiet crack, feel a satin-smooth melt on your tongue, and taste the balance of sweetness, savoriness, and roasted warmth that lingers pleasantly after the last bite.
The Story Behind the Dish
Chocolate and peanut butter have a long, affectionate history that reads like a mini travelogue through the popular palate. Chocolate, with its ancient roots in Mesoamerica, carried ceremonial weight and then quiet sweetness into daily life as it spread across continents. Peanut butter, born from the late 19th and early 20th centuries in the United States, emerged as a nutritious, creamy staple that could be spooned, spread, or stirred into countless dishes. When these two ingredients began to meet in confectionery workshops, bakeries, and kitchen tables, a simple pairing blossomed into iconic combinations that survive and thrive across generations.
The exact origin of the chocolate-peanut butter cup is a tale of entrepreneurial spirit. In the 1920s, candy makers began to experiment with pairing the smooth, velvety texture of chocolate with the rich, creamy, slightly salty bite of peanut butter. The idea caught fire—think of a glossy chocolate shell encasing a cloud of peanut butter—creating a bite-sized dessert that felt both nostalgic and novel. In the United States, one name is often recalled in relation to this invention: Reese, who popularized the ready-to-enjoy cup and helped transform the pairing into a staple of seasonal treat trays, movie nights, and party dessert tables. Yet the appeal of chocolate and peanut butter travels beyond borders: bakers in Italy, the United Kingdom, and beyond adapt the combination to local techniques and textures, from ganache-filled pastries to crisp-edged bars to simple, elegant dipped chocolates. Cioccolato Burro Arachidi captures that global charm and folds it into a distinctly comforting, almost universal experience: chocolate that glows with depth and peanut butter that glides with ease, balanced by a touch of salt and perhaps a whisper of sea-salt crystal crunch.
In many kitchens, this flavor duo becomes a canvas for sentiment—grandmothers passing down secret tips, friends exchanging a quick “I made this for you” moment, or bakers testing the balance of sweetness and savoriness. It’s a dish that invites storytelling as it is designed to be tasted. The Italian-influenced style of this treat often emphasizes high-quality cocoa, a glossy finish, and the optional inclusion of delicate textures—crisped rice, finely chopped nuts, or a dusting of cocoa powder—to add dimension without overwhelming the core harmony. It’s a dessert that rewards patience: tempered chocolate that shines, a peanut butter center that remains pleasantly soft, and a finish that hints at both chocolate-depth and nutty warmth long after the plate has emptied.
Why You’ll Love This Recipe
- Versatility in texture: whether you prefer a satin, melt-in-your-mouth center or a slightly more structured bite with a delicate snap, this chocolate–peanut butter pairing can adapt to your preferred mouthfeel.
- Simple elegance: with a handful of pantry staples, you can achieve a refined finish that feels bakery-worthy but is approachable enough for a weeknight treat.
- Make-ahead friendly: this is one of those desserts that benefits from resting time—chilling the chocolate shell or letting a peanut butter filling set can deepen flavors and improve texture.
- Customizable to dietary needs: by choosing dairy-free chocolate or adjusting the sweetener, you can create a satisfying version that suits vegan, gluten-free, or low-sugar preferences without sacrificing personality.
- Perfect for gifting: individually wrapped pieces or a nicely arranged tray make a thoughtful present for neighbors, colleagues, or hosts—no wrapping required beyond a pretty box or a simple ribbon.
- Pairing-friendly: these flavors pair beautifully with coffee, milk, a glass of milk stout, or a late-afternoon tea, making them a natural addition to seasonal dessert tables or everyday indulgences alike.
- Timeless appeal: chocolate and peanut butter is a classic combination that resonates with both kids and adults—nostalgia without sacrificing sophistication.
Flavor Profile & Texture
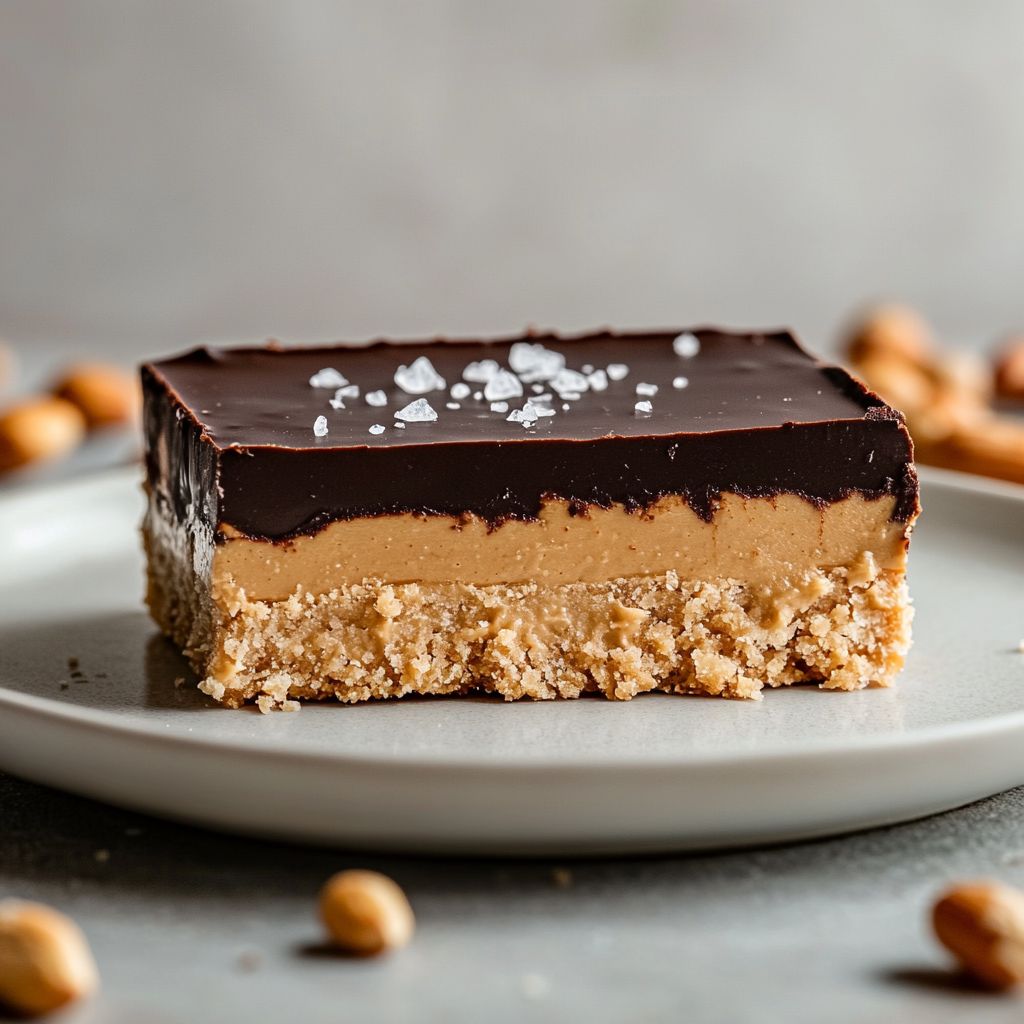
The flavor profile of Cioccolato Burro Arachidi is a study in balance. The chocolate provides a deep, roasted aroma with a velvety sweetness that can swing from milk-chocolate warmth to more intense, dark-cocoa notes, depending on the cocoa percentage you choose. If you opt for a dark chocolate, the bitterness will play against the peanut butter’s creaminess, creating a sophisticated, almost grown-up treat. A good peanut butter that isn’t overly sweet adds another layer of nuance: roasted peanut notes, a whisper of salt, and a silky mouthfeel that carries through the middle of each bite. The salt becomes a crucial companion to the two stars—the salt sharpens the chocolate’s flavor and highlights the roasted notes in the peanut butter, while also preventing the sweetness from becoming cloying.
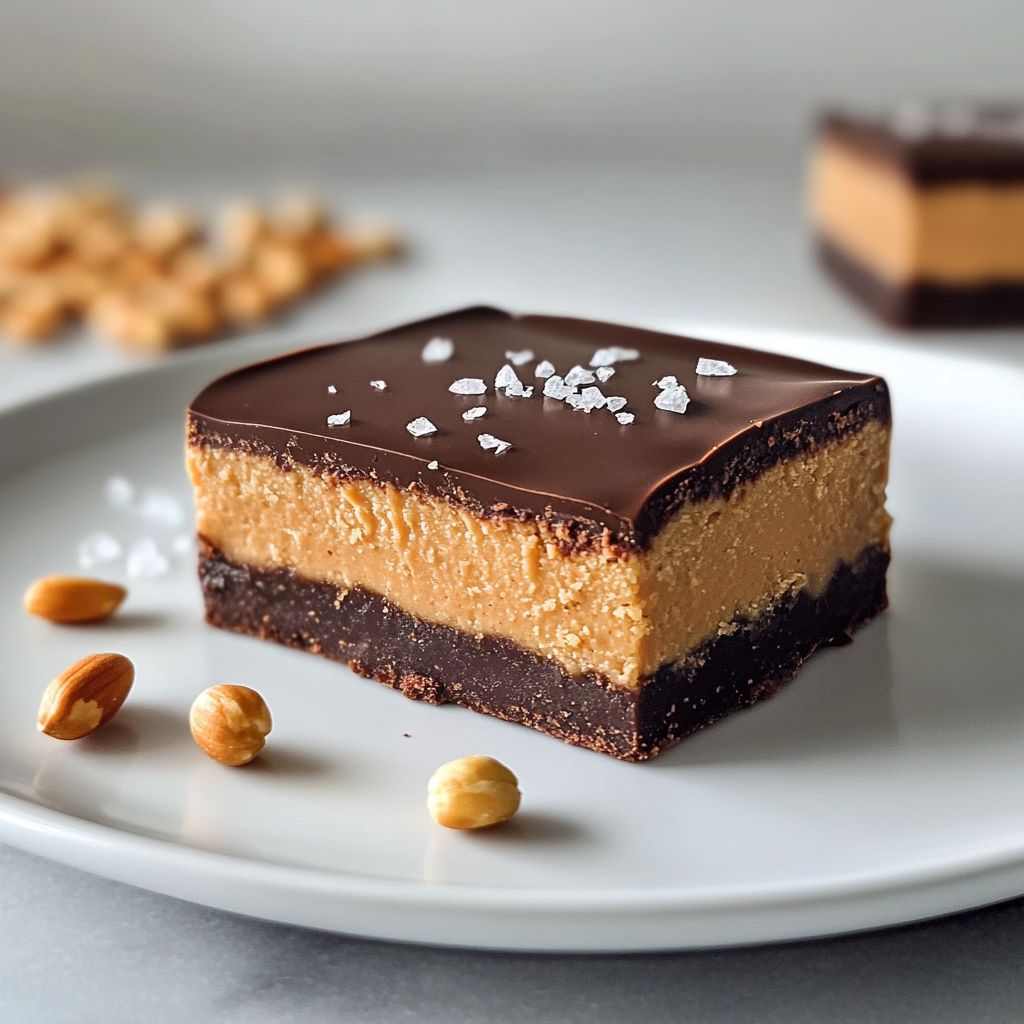
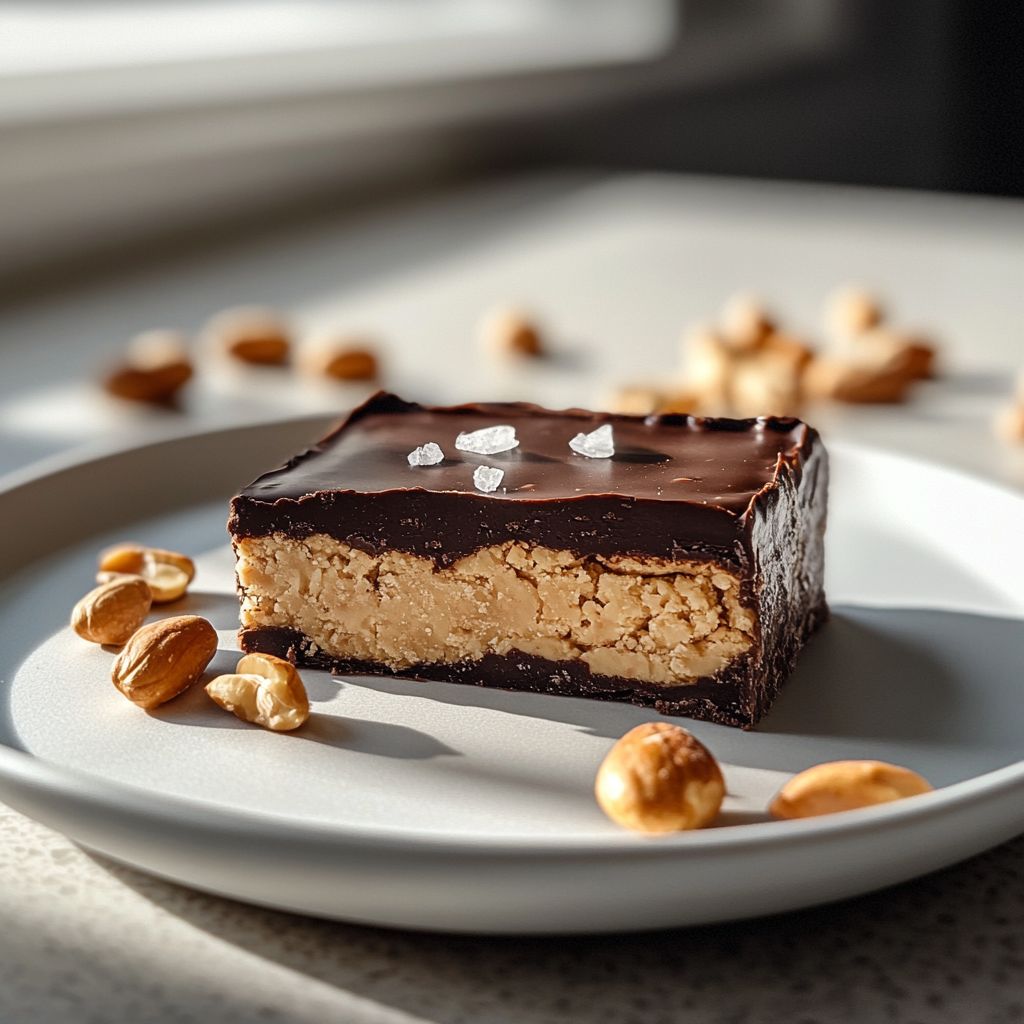
Texture-wise, you can envision a glossy, smooth shell encasing a luscious center. The exterior should have a pristine shine and a clean, crisp snap when broken or bitten. Inside, the center remains pleasantly soft, with a gentle resistance that reveals the peanut butter’s creaminess and any added textures, such as lightly crushed peanuts or crisped rice, if you choose to fold them into the filling. The contrast between the crisp, shell-like chocolate and the inner, almost velvety core is what elevates this dessert from a simple candy to a memorable tasting experience. If you plan to incorporate a delicate crunch, think about adding roasted peanut bits, a sprinkle of sea salt, or a thin layer of crisped rice to the bottom of the shell. Each addition brings a new dimension—crunch, saltiness, and a fleeting toasty note that lingers softly as the chocolate coats your palate.
Flavor harmony is essential here. The chocolate should never feel heavy; it should elevate and compliment the peanut butter, which itself should not dominate with sweetness. The best iterations strike a midpoint: chocolate that coats with a mirror-like gloss, peanut butter that is mellow but unmistakably peanut-forward, and a final touch of salt to tie everything together. Aroma plays a big role as well: the scent of roasted peanuts invites you in, and as the chocolate sets, the scent settles into a comforting, inviting finish. For those who enjoy a subtle twist, an optional dusting of cinnamon, chili powder, or espresso powder can brighten the flavor profile without overpowering the core duo. The result is a dessert that feels familiar in the best possible way—comforting, indulgent, and emotionally satisfying, with a modern polish that suits contemporary dessert tables as well as traditional family gatherings.
Occasions & Pairings
This treat shines in a variety of settings, from casual weeknight sweets to festive giftable goodies. On a weeknight, a small plate of Cioccolato Burro Arachidi can accompany a hot cup of coffee, a glass of cold milk, or a robust vanilla bean ice cream. For gatherings, arrange the chocolates in elegant paper liners or serve as part of a larger dessert board with fruits, nuts, and a few bars of crisp wafers to provide contrast. The versatility makes it a dependable choice for multiple occasions:
a refined finish for Christmas Eve dinners, Easter gatherings, or anniversary celebrations where guests expect something both comforting and a touch refined. - Party favorites: a crowd-pleasing bite that travels well in boxes, baskets, or trays and holds up at room temperature for a few hours if kept away from heat.
- Gift-ready sweets: individually wrapped chocolates or a coordinated box makes a thoughtful, handmade present that feels special but not fussy.
- Pairings to enhance the experience: coffee and espresso drinks; full-bodied milk or dark beers; a glass of port or a light red wine; vanilla, coffee, or caramel ice cream; fresh berries for a bright counterpoint; and a sprinkle of flaky sea salt to highlight the chocolate’s sweetness and the peanut butter’s savoriness.
For a complete sensory menu, consider building a short tasting tray: one or two pieces with a bold dark chocolate, one with a smooth milk chocolate, and one with a crisped-rice variation. Let guests compare the differences in texture, aroma, and balance. You’ll likely notice how the simplest variations—type of chocolate, presence of salt, or the addition of a crunchy element—dramatically alter the overall experience. These nuances are what make Cioccolato Burro Arachidi not just a dessert, but a small, edible landscape of flavor and texture that invites exploration and conversation.
Tips, Variations & Substitutions
- Dairy-free and vegan options: use dairy-free dark chocolate or milk alternatives and either a plant-based butter substitute or a vegan peanut butter. For a smoother finish, slightly warm the chocolate to encourage a glossy shell, then temper it to stabilize the snap, even with dairy-free ingredients.
- Sweetness adjustments: if you prefer a less sweet bite, opt for 70%+ cacao dark chocolate or consider using a chocolatier’s dark couverture with a natural, lower-sugar profile. For sweeter preference, choose a milk chocolate with a higher cocoa butter content, and a touch of sugar in the peanut butter to balance the palate.
- Texture twists: fold in coarsely chopped roasted peanuts for a rustic crunch, use crisped rice for a light airy snap, or sprinkle fine sea salt on top just after dipping to amplify the flavor contrast.
- Flavor folds: a pinch of ground cinnamon, espresso powder, or smoky paprika can push the flavor into dessert-bar territory. A few crystal flakes of maldon or fleur de sel add a final, magical salt-kissed finish.
- Gluten-free and grain-free considerations: ensure that all chocolate and any add-ins are certified gluten-free if you’re catering to gluten intolerance. If you want a grain-free base for a bar-like version, you could start with a cocoa-almond crust and fill with peanut butter ganache, but note that the classic “peanut butter cup” shape relies on a chocolate shell and a peanut butter center rather than a crust.
- Make-ahead options: you can make the chocolate shells in advance and fill them with a prepared peanut butter center later, or assemble and refrigerate for a crisp, fresh finish. Freezing is a strong option for long-term storage, especially if you wish to transport them to events in advance. Wrap individually to prevent sticking and to preserve the glossy surface.
- Regional twists: in some regions, a touch of hazelnut paste can be added for a Nutella-inspired variation; in others, a drizzle of white chocolate on top provides a striking visual and a different sweetness profile. You can also experiment with cocoa nibs for a crunchy bite and a cocoa intensity that lingers on the palate.
Storage & Make-Ahead Ideas
To maintain the pristine appearance and texture, store Cioccolato Burro Arachidi in a cool, dry place away from direct sunlight. The ideal environment is a pantry or a dedicated dessert drawer that stays around 60-68°F (15-20°C). If your kitchen runs warm, a quick chill in the refrigerator (not the freezer) helps the shell set properly and prevents the center from becoming overly soft. Once set, handle pieces gently to avoid fingerprints or smudges on the glossy surface, and place them in parchment or silicone liners to prevent sticking.
Leftover pieces, if there are any, store well for several days in an airtight container. For longer-term storage, you can freeze the chocolates for up to 2-3 months. Wrap each piece individually in parchment paper, then place in a rigid container or a sealed freezer bag to protect against odor absorption. When ready to enjoy, thaw gradually at room temperature to preserve the texture and sheen, avoiding rapid temperature changes that could cause condensation on the surface. If you’ve used any added crunchy elements, you may notice moisture changes affecting texture after freezing; in that case, a quick re-temper of the chocolate shell can help restore snap and gloss before serving again.
Make-ahead ideas include preparing the chocolate shells in advance and filling them up to a day later, which is a particularly handy approach for holiday parties or gift boxes. You can also prepare a large batch of peanut butter centers and freeze them in small portions; when you’re ready to assemble, simply temper more chocolate, dip, and set. This approach minimizes last-minute rushes and allows you to tailor quantities for a crowd. If you’re plating for a dinner party, consider prepping a few “choose-your-own” topping options: sea salt, chopped roasted almonds, a pinch of chili powder, or a dribble of toasted sesame oil for a surprising finish that complements the peanut butter without overpowering it.
Fun Facts & Trivia (Optional)
- The classic chocolate–peanut butter pairing has a long-running love affair in American confections and has inspired countless variations, from cups and bars to brownies and cookies. It’s a testament to how two ingredients can become a signature flavor profile when treated with care and balance.
- The rise of peanut butter cups in the early 20th century is tied to the rise of modern packaged confections. Chocolate makers and candy inventors experimented with combining the smoothness of chocolate with the creamy, savory depth of peanut butter, leading to a universal favorite that transcends age and culture.
- In the culinary world, the pairing of chocolate and nuts—whether peanuts, almonds, or hazelnuts—has long been celebrated for its textural contrasts and sensory complexity. The addition of salt as a flavor enhancer is a relatively simple trick that elevates both the chocolate and the nutty paste, turning a simple treat into a memorable tasting experience.
- Italy, with its own rich chocolate heritage, often celebrates confectionery that emphasizes glossy finishes and refined textures. Cioccolato Burro Arachidi nods to that tradition while embracing the American peanut butter story, creating a bridge between continents and culinary histories.
- For chocolate lovers who enjoy a modern twist, chocolate with peanut butter is a versatile canvas for other culinary explorations—think salted caramel layers, coffee-infused ganache, or a hint of orange zest that brightens the palate in unexpected ways.
Ingredients
- Base al Cioccolato
- 1 1/2 cups all-purpose flour (or gluten-free flour blend)
→ Provides structure for the base and helps bind the chewy brownie-like layer. If using a gluten-free blend, choose a 1:1 GF flour and consider adding 1/4 teaspoon xanthan gum per cup to mimic gluten. Sift with the cocoa to ensure even distribution and avoid lumps; mix until just combined to keep the base tender. - 1/2 cup unsweetened cocoa powder
→ Creates the rich chocolate flavor and deep color. Sift with the flour to prevent clumps and ensure even distribution. Dutch-processed will yield a smoother, milder chocolate notes; natural cocoa will be more robust and slightly fruity, so adjust sugar accordingly. - 1/2 cup granulated sugar
→ Sweetens the base and helps with moisture retention and browning during baking. If you prefer a deeper flavor, substitute with light brown sugar or a mix of brown and white sugar. For a less sweet bar, reduce by up to 2 tablespoons. - 1/3 cup unsalted butter, melted
→ Adds richness and tenderness to the crumb; ensures a fudgy yet crumbly texture. Let the melted butter cool slightly before mixing with dry ingredients to prevent cooking the egg if you include one in the base; use dairy-free butter if a vegan version is desired. - 1 large egg
→ Acts as a binder and contributes to the structure and moisture of the base. At room temperature, it emulsifies better for a cohesive batter. For vegan preparation, substitute with 1 chia egg (1 tablespoon chia seeds + 2.5 tablespoons water, rested 5–10 minutes) or 1/4 cup applesauce plus 1 tablespoon melted coconut oil. - 1/2 teaspoon vanilla extract
→ Enhances the chocolate aroma and rounds sweetness; use pure vanilla for best flavor. If you prefer, you can omit, but it adds a noticeable depth to the base. - 1/4 teaspoon salt
→ Balances sweetness and enhances chocolate intensity; use with unsalted butter. If your butter is salted, reduce or omit this salt to avoid over-seasoning.
- 1 1/2 cups all-purpose flour (or gluten-free flour blend)
- Ripieno al Burro di Arachidi
- 1 cup creamy peanut butter (smooth)
→ Core filling that provides the signature salty-sweet contrast and a creamy texture. Stir well if the PB has oil separation; for natural peanut butters, use a whisk or beat with a little powdered sugar to achieve a smooth, spreadable consistency. - 1/4 cup powdered sugar (confectioners’)
→ Helps the filling set and stay cohesive without becoming gritty. Sift before measuring to prevent lumps; adjust to taste if you like it sweeter or slightly more savory. - 2 tablespoons unsalted butter, softened
→ Adds richness and helps create a glossy, cohesive filling that holds its shape when chilled. If vegan, substitute with coconut oil or dairy-free butter and ensure it’s soft for easy mixing. - 1/2 teaspoon vanilla extract
→ Boosts the peanut butter aroma and smooths the overall flavor; optional–add a pinch of salt to balance if the peanut butter is unsalted.
- 1 cup creamy peanut butter (smooth)
- Glassa al Cioccolato
- 1/2 cup semisweet chocolate chips
→ Creates a glossy, appealing top coating that locks in moisture and adds extra chocolate flavor. Melt gently using a double boiler or microwave in short bursts, stirring until smooth. For a vegan option, use dairy-free chocolate chips. - 1 tablespoon coconut oil or butter
→ Keeps the melted chocolate fluid for a thin, even glaze and helps achieve a shiny finish. Coconut oil provides a clean sheen and sets firm at room temperature; adjust quantity to reach your desired pourability.
- 1/2 cup semisweet chocolate chips
- Optional Toppings
- 1/4 cup chopped roasted peanuts (optional)
→ Adds extra crunch and peanut flavor. Toast the peanuts lightly to deepen aroma, then scatter over the warm glaze so they adhere well. Ensure they are fully cooled before serving to maintain crispness. - Sea salt flakes for finishing (optional)
→ A light pinch enhances the chocolate and peanut butter contrast. Sprinkle after glazing and just before the chocolate sets for best adhesion and a balanced finish.
- 1/4 cup chopped roasted peanuts (optional)
Instructions
- Preheat your oven to 350°F (175°C) and line a 9×9-inch baking pan with parchment paper or grease it well.
→ Preheating ensures even baking from the start and lining the pan prevents sticking, which makes clean removal and slicing easier. - Sift together the dry components for the base: 1 1/2 cups all-purpose flour (or gluten-free flour blend) and 1/2 cup unsweetened cocoa powder, then whisk in 1/2 cup granulated sugar and 1/4 teaspoon salt until uniformly distributed.
→ Sifting with the cocoa avoids lumps and yields a consistent, tender crumb; a light whisk ensures even color and sweetness distribution. - If using gluten-free flour, add 1/4 teaspoon xanthan gum per cup of flour to mimic gluten and improve structure; whisk again to evenly incorporate.
→ Xanthan gum acts as a binder in gluten-free blends, giving your base cohesion and chew without graininess. - Whisk in the wet elements for the base: 1 large egg and 1/3 cup melted unsalted butter that has cooled slightly, along with 1/2 teaspoon vanilla extract, until the mixture is smooth and cohesive.
→ The cooled butter prevents scrambling the egg and helps emulsify fat with moisture for a glossy, uniform batter. - Fold the wet ingredients into the dry ingredients and mix just until combined, stopping as soon as there are no visible flour streaks.
→ Overmixing develops gluten in flour-based batters or toughens gluten-free blends; just-wet batter yields a tender base with fudgy character. - Spread the batter evenly in the prepared pan to about 1/4-inch thickness, using a spatula to press and smooth the surface.
→ An even layer ensures uniform baking and a stable foundation for the peanut butter filling. - Bake the base for 12–14 minutes at 350°F (175°C) until the edges set and a toothpick inserted near the center comes out with a few moist crumbs; then remove and let it cool completely on a rack.
→ Cooling fully sets the structure so the filling can be spread without sliding, and prevents the filling from sinking into the base. - Prepare the peanut butter filling by combining 1 cup creamy peanut butter with 1/4 cup powdered sugar, 2 tablespoons softened unsalted butter, and 1/2 teaspoon vanilla extract in a bowl; stir until smooth and cohesive.
→ Powdered sugar helps the filling hold shape without gritty texture, while the butter adds gloss and cohesion for easy spreading. - If the peanut filling is very stiff, briefly warm it in the microwave in 5-second bursts or let it sit at room temperature for a few minutes, then stir to achieve a spreadable consistency that can be evenly brushed over the cooled base.
→ A spreadable filling ensures a uniform layer without tearing the base or causing gaps at the edges. - Spread the peanut butter filling in an even, thin layer over the cooled chocolate base using an offset spatula, keeping it away from the pan edges to avoid overflow during glazing.
→ A controlled, even layer gives clean slices and prevents the glaze from pooling at the sides. - Chill the assembled pan in the refrigerator for 20–30 minutes or until the peanut butter layer is firm to the touch; this helps the layer hold its shape when you apply the glaze.
→ Chilled filling resists smearing under the chocolate glaze and yields clean, precise bars. - Meanwhile, prepare the chocolate glaze by melting 1/2 cup semisweet chocolate chips with 1 tablespoon coconut oil or butter in a double boiler or in short microwave bursts, stirring until smooth and glossy.
→ The addition of fat keeps the glaze thin enough to pour and creates a shiny, professional finish that sets nicely as it cools. - Pour and spread the warm glaze over the peanut butter layer in a thin, even sheet, tilting the pan to reach the edges without missing any spots; avoid creating thick edges that crack later.
→ A smooth, even glaze seals the filling and provides a glossy top that highlights the layers. - If using optional toppings, scatter 1/4 cup chopped roasted peanuts over the glaze while it is still warm so they adhere, and gently press them into the surface.
→ Toasted peanuts deepen aroma and crunch; pressing them helps them stay put as the glaze sets. - Finish with a light sprinkle of sea salt flakes (optional) over the glaze just as it begins to set for a balanced sweet-salty finish.
→ Salt enhances chocolate and peanut butter contrast and intensifies flavor with a sophisticated finish. - Let the glaze set completely at room temperature or refrigerate about 30 minutes for a quicker firming, then lift the bars from the pan using the parchment overhang and cut into even squares or rectangles with a sharp, warm knife for clean edges.
→ Properly set bars slice cleanly, showing distinct layers, and a warm knife prevents dragging of glaze while cutting.
Notes
These Cioccolato Burro Arachidi bars are a luscious mix of a chewy chocolate base, a salty-sweet peanut butter filling, and a shiny chocolate glaze. To ensure clean edges and even layers, line the pan with parchment and press the base firmly and evenly. For gluten-sensitive cooks, use a 1:1 gluten-free flour blend and verify that all other ingredients (cocoa and chocolate chips) are gluten-free. If you want a vegan version, replace the egg with a chia or flax egg and substitute dairy ingredients with plant-based alternatives (vegan butter and dairy-free chocolate).
Base preparation tips: Sift the all-purpose flour (or gluten-free blend) with the cocoa to prevent lumps and to distribute the color evenly. Whisk in the granulated sugar and salt. Let the melted butter cool slightly before whisking in the egg and vanilla so the egg doesn’t scramble. Add wet ingredients to the dry just until combined to keep the base tender and fudgy; overmixing can make it dry or tough. Press the batter into an even layer in the prepared pan and use a spatula to smooth the surface.
Ripieno al Burro di Arachidi tips: Stir the peanut butter until completely smooth and emulsified; if natural peanut butter has oil separation, whisk to combine. Sift the powdered sugar to avoid gritty texture, then beat with the softened butter and vanilla until glossy. Taste and adjust salt if needed. Spread the filling evenly over the cooled base and chill until the filling is firm before glazing.
Glassa al Cioccolato tips: Melt the chocolate chips with the coconut oil or butter until smooth and glossy. Let it cool slightly so it doesn’t melt the filling when you pour. Pour a thin, even layer over the set peanut butter and tilt the pan to cover the surface. Allow the glaze to set completely at room temperature or refrigerate for faster results. Optional toppings like chopped roasted peanuts and a light sprinkle of sea salt add texture and a final punch of flavor; scatter before the glaze fully hardens so they adhere.
Serving and storage: Chill the assembled bars until the glaze is firm, then cut into bars with a sharp knife; wipe the blade between cuts for clean edges. Store in an airtight container in the fridge for up to a week, or freeze for longer storage. Bring to room temperature for 15–20 minutes before serving for the best bite. This treat pairs wonderfully with a cold glass of milk or a cup of coffee.
Tips
Consigli pratici per Cioccolato Burro Arachidi
- Scegli ingrediente a temperatura ambiente quando richiesto (uovo, burro, burro di arachidi) per una emulsione più omogenea e una consistenza più liscia.
- Setacciare insieme farina e cacao con la nota di xanthan gum (se usi una versione senza glutine) aiuta a evitare grumi e a dare struttura stabile alla base.
- Se utilizzi cacao naturale, il sapore sarà più robusto e fruttato: potresti voler aumentare leggermente lo zucchero o bilanciare con un pizzico di sale extra, a seconda dei tuoi gusti.
- Non lavorare troppo l’impasto della Base al Cioccolato: mescola solo fino a quando gli ingredienti sono incorporati per mantenere una base tenera e fudgy.
- Per evitare che l’uovo si cuocia quando aggiungi burro fuso, lascia raffreddare leggermente il burro fuso prima di unirlo agli ingredienti secchi.
- Versione vegana: sostituisci l’uovo con una chia egg (1 cucchiaio di semi di chia mescolato a 2,5 cucchiai di acqua; lascia addensare) oppure usa 1/4 di tazza di purè di mela o purea di banana insieme a olio di cocco; scegli una margarina o burro vegetale al posto del burro.
Consigli per la Base al Cioccolato
- Setaccia farina e cacao insieme per una distribuzione uniforme e una base senza grumi.
- Se usi una farina senza glutine, aggiungi 1/4 cucchiaino di xanthan gum per cup di farina per imitare la chiusura della glutine.
- Per una glassa di cioccolato più liscia, preferisci cacao olandese (Dutch-process) se vuoi sapore più morbido; il cacao naturale darà nota più vigorosa, quindi regola lo zucchero di conseguenza.
Consigli per il Ripieno al Burro di Arachidi
- Se il burro di arachidi tende a separarsi, mescola bene per riunire l’olio; per burro di arachidi naturale, usa una frusta o monta con un po’ di zucchero a velo fino a ottenere una crema liscia e spalmabile.
- Per una consistenza compatta e setosa, assicurati che il burro sia morbido ma non sciolto mentre aggiungi zucchero a velo e vaniglia.
- Puoi aumentare o diminuire lo zucchero a velo in base al tuo gusto: più zucchero darà una crema più densa e dolce.
Glassa al Cioccolato: trucchi e tecnica
- Sciogli il cioccolato a bagnomaria o al microonde, mescolando spesso. Fai raffreddare leggermente prima di versarlo sulla base per una glassa lucida e non troppo liquida.
- Aggiungi 1 cucchiaio di olio di cocco o burro per una glassa più fluida e lucida che si stenderà bene. L’olio di cocco tende a solidificarsi a temperatura ambiente, donando una finitura brillante.
- Versa la glassa ancora tiepida sulla superficie calda ma non bollente per ottenere una copertura liscia e uniforme.
Optional Toppings e presentazione
- 1/4 cup di arachidi tostate tritate: tostatele leggermente in padella per intensificare l’aroma, poi distribuiscile subito sulla glassa ancora morbida per far aderire bene.
- Una leggera spolverata di fiocchi di sale marino esalta il contrasto tra cioccolato e burro d’arachidi; aggiungi solo al momento giusto, prima che la glassa indurisca.
Note di servizio
- Lascia raffreddare completamente la tavoletta prima di tagliarla per definire meglio i pezzi.
- Conserva in frigorifero se vuoi che il ripieno rimanga ben stabile; porta a temperatura ambiente per qualche minuto prima di servire per un morso più morbido.
FAQ
Cioccolato Burro Arachidi – FAQ
Che cos’è Cioccolato Burro Arachidi?
È un dolce semplice che combina cioccolato fondente o al latte con burro di arachidi. Può essere preparato come barretta, tavoletta o piccoli tartufi senza cottura, spesso raffreddato in frigorifero per solidificarsi.
Quali ingredienti servono?
Ingredienti base (per una tavoletta):
- 200 g di cioccolato fondente o al latte
- 150 g di burro di arachidi cremoso
- 2–3 cucchiai di zucchero a velo (facoltativo)
- 20 g di burro o olio di cocco (facoltativo, serve a rendere più lucido e morbido)
- 1 cucchiaino di estratto di vaniglia
- un pizzico di sale
- opzionali per decorare: granella di sale, arachidi tritate, cocco grattugiato
Come si prepara passo passo?
Procedimento semplice:
- Fondi il cioccolato a bagnomaria o al microonde, mescolando di tanto in tanto.
- In una ciotola a parte, mescola burro di arachidi con vaniglia, zucchero a velo (se usato) e un pizzico di sale.
- Versa uno strato sottile di cioccolato fuso in una teglia rivestita con carta da forno.
- Lascia solidificare leggermente in frigorifero (5–10 minuti).
- Aggiungi il ripieno di burro di arachidi e livellalo.
- Copri con il resto del cioccolato fuso e liscia la superficie.
- Raffredda in frigorifero finché il cioccolato è completamente solido, quindi taglia a barrette o spezza in pezzi.
Posso usare cioccolato al latte invece che fondente?
Sì. Puoi usare cioccolato al latte o fondente a seconda del tuo gusto. Il gusto e la consistenza cambieranno leggermente, ma il risultato sarà altrettanto gustoso.
È possibile prepararla in versione vegana?
Sì. Usa cioccolato fondente vegano e burro di arachidi senza derivati animali. Puoi sostituire il burro normale con olio di cocco o olio vegetale per facilitare l’emulsione, se preferisci.
Posso trasformarla in tartufi anziché in barrette?
Assolutamente. Dopo aver mescolato burro di arachidi e cioccolato, lascia rassodare e poi con le mani forma delle palline. Ripassale nel cioccolato fuso e mettile a raffreddare su carta forno.
Come conservarla?
Conservala in frigorifero in un contenitore ermetico. Si mantiene bene per 1–2 settimane. Per una conservazione più lunga, puoi anche congelarla (2–3 mesi); lascia scongelare a temperatura ambiente prima di servirla.
Come personalizzare la ricetta?
Varianti comuni:
- Aggiungi una manciata di arachidi tostate spezzettate tra uno strato e l’altro.
- Spruzza una piccola quantità di sale grosso prima di raffreddare per un contrasto salato-dolce.
- Incorpora una cucchiaiata di miele o sciroppo d’acero per una dolcezza diversa.
- Usa cioccolato bianco per una versione panna e rosee con burro di arachidi chiaro.
Quali sono gli errori comuni da evitare?
Errori comuni:
- Cioccolato che si solidifica troppo rapidamente se non raffredda in modo uniforme.
- Burro di arachidi troppo denso o poco cremoso, che rende difficile lo strato uniforme.
- Non raffreddare abbastanza tra gli strati, provocando rivestimento non uniforme.
- Utilizzare cioccolato troppo vecchio o non conservato correttamente che non si tempera bene.
Quante porzioni rende?
Con una tavoletta da circa 20×15 cm, tagliata a pezzi, otterrai circa 12–16 porzioni, a seconda delle dimensioni delle barrette o dei tartufi che prepari.