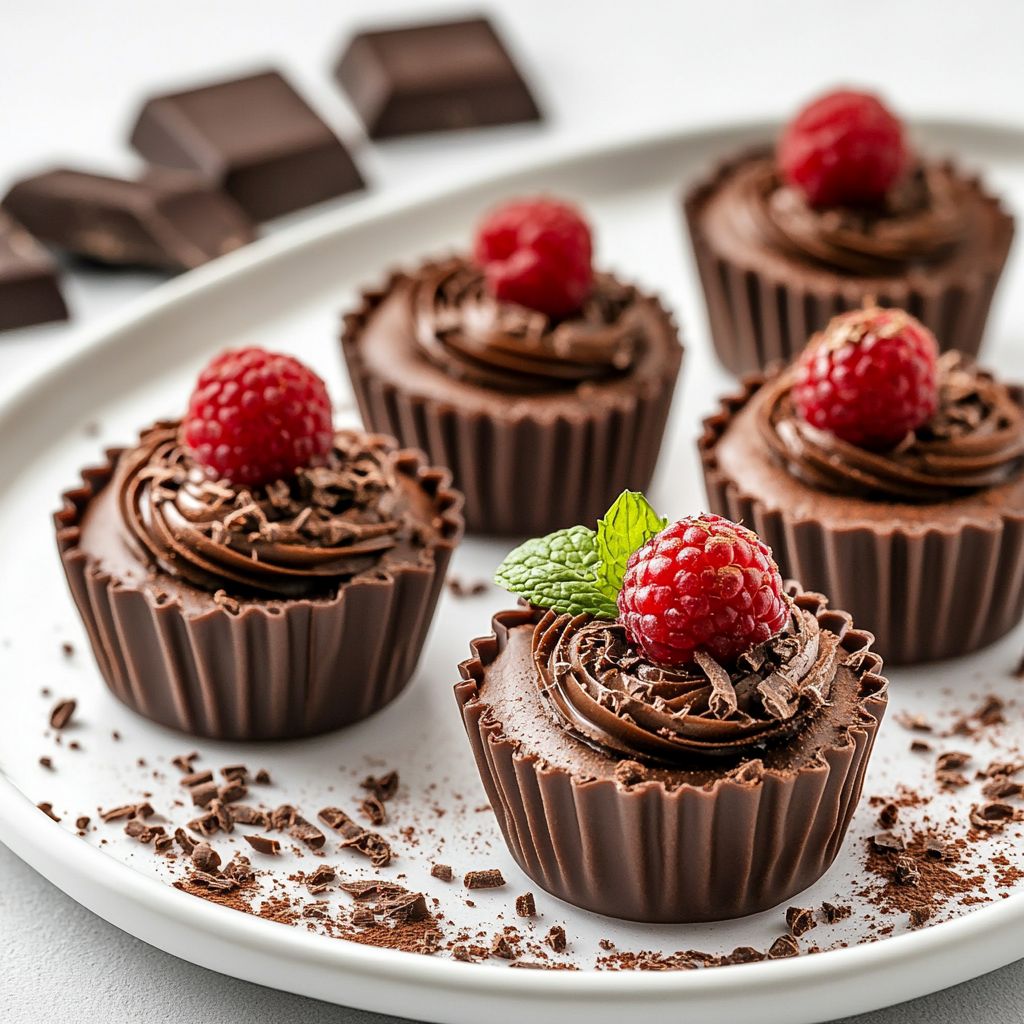
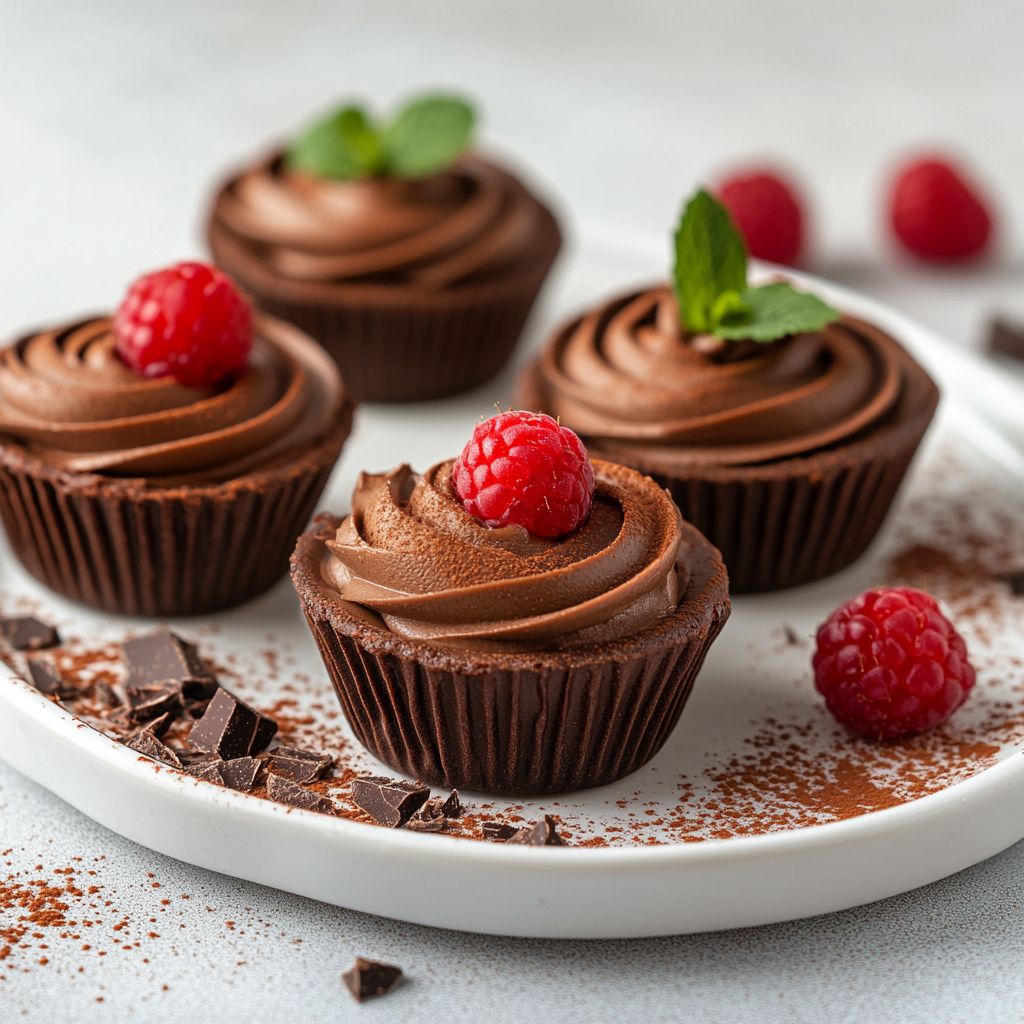
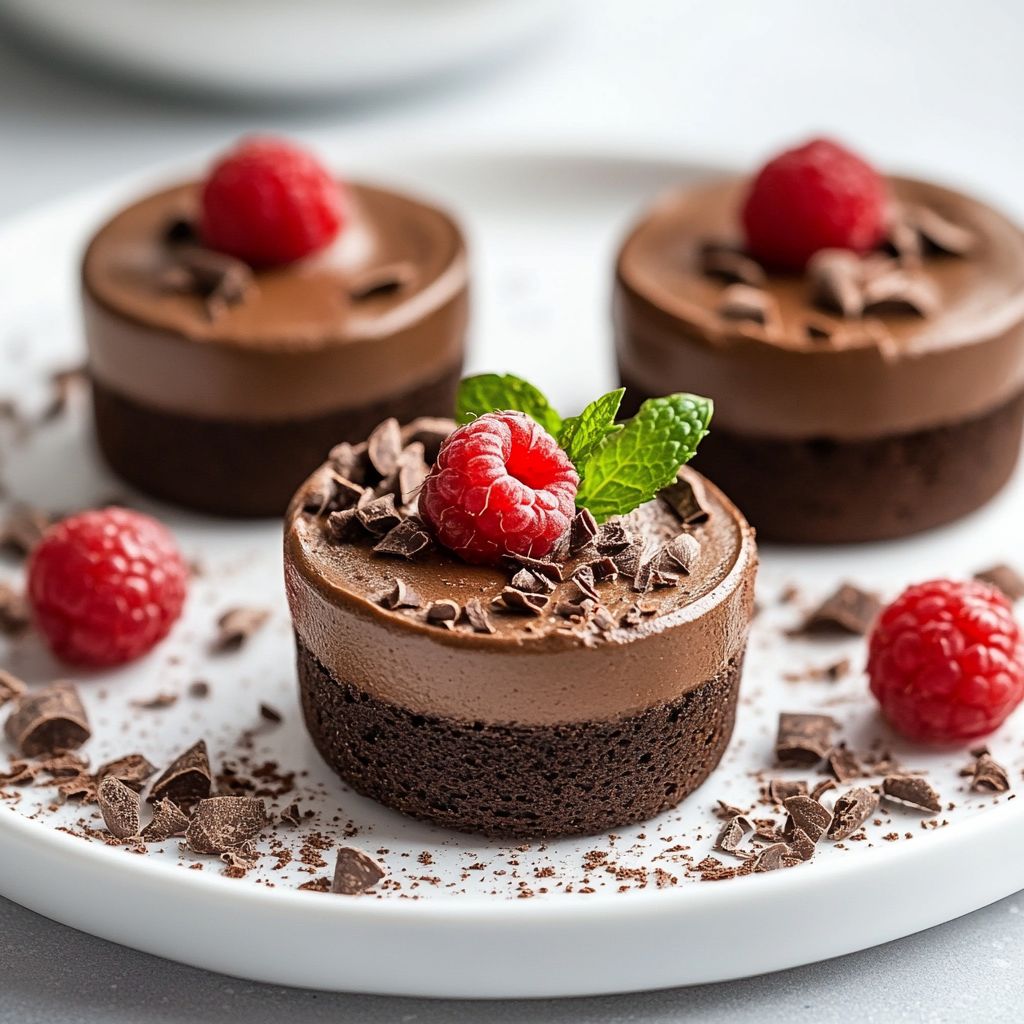
Introduction to Baked Chocolate Mousse Cups
Imagine a dessert that is both luxurious and comforting, a sweet treat that elegantly marries the rich, deep flavors of chocolate with the light, airy texture of a mousse. Enter Baked Chocolate Mousse Cups: a delectable fusion of chocolate intensity and melt-in-your-mouth softness, baked to perfection. These delightful cups offer a sophisticated indulgence that’s both visually stunning and extraordinarily palatable. Whether you’re a chocoholic in search of your next fix or simply looking for a show-stopping dessert to wow your guests, these mousse cups provide an unforgettable tasting experience. The moment you take a bite, the velvety smooth mousse envelops your senses with its decadent chocolate embrace, leaving you wanting more with each spoonful.
The Story Behind the Dish
Though mousse has its origins in France, where it was first recorded in the 18th century, its journey to oven-baked perfection in the form of these delightful cups is a more contemporary evolution. Traditional chocolate mousse was originally part of the haute cuisine, served cold, with chocolate’s luxurious appeal reflecting its status as a dessert for the affluent. Its transformation into a baked dessert is a testament to the endless creativity and adaptability of culinary arts. By baking mousse, you introduce a new textural element: the crispiness of a slightly baked top, paired with the creamy, rich interior that we have come to love. Baked Chocolate Mousse Cups marry the fine traditions of French cooking with modern pastry innovations to produce an irresistible confection.
Why You’ll Love This Recipe
- Rich and Indulgent: The deep, aromatic chocolate flavor provides an intensely satisfying experience for chocoholics and dessert lovers alike.
- Elegant Presentation: Individual cups not only create a sophisticated look but also allow for perfectly portioned servings, making it ideal for formal events or intimate gatherings.
- Textural Contrasts: Enjoy the interplay between the crisp top layer and the smooth, airy mousse beneath, creating a delightful mouthfeel.
- Easy to Customize: Endless possibilities to enhance and personalize these mousse cups with additional flavors or garnishes.
Flavor Profile & Texture
Baked Chocolate Mousse Cups bring an array of textures and flavors that dance harmoniously on the palate. The initial bite yields a light crust, giving way to the silken luxury of the mousse. This marriage of textures is a masterclass in balanced indulgence. The flavor is a rich symphony of dark, roasted chocolate with subtle bitter notes beautifully complemented by the creamy sweetness of the mousse. A hint of vanilla in the background elevates the chocolate, adding aromatic layers that further enhance the dessert’s allure. This complex yet comforting flavor profile makes these mousse cups both sophisticated and profoundly satisfying.
Occasions & Pairings
These Baked Chocolate Mousse Cups are perfect for a variety of occasions:
- Dinner Parties: Impress your guests with an elegant end to the meal.
- Romantic Dinners: The luxuriousness of chocolate makes these cups perfect for a Valentine’s Day dinner or anniversary celebration.
- Festive Gatherings: Their rich and indulgent quality is ideal for holidays where dessert is a centerpiece, like Christmas or Easter.
For pairing, consider serving them with a glass of red wine or a cappuccino to complement the chocolate’s robust flavor. A scoop of vanilla ice cream on the side or some fresh berries could also add a delightful contrast and enhance the overall experience.
Tips, Variations & Substitutions
While this recipe for Baked Chocolate Mousse Cups is perfect as is, there are numerous ways to adapt and play with the flavors:
- Spice it Up: Add a pinch of cayenne pepper or cinnamon for a spicy twist that intrigues the palate.
- Diverse Chocolate: Experiment with different types of chocolate — from white to bittersweet — for varied flavor profiles.
- Liqueur Infusion: Enhance the mousse with a splash of coffee liqueur, orange liqueur, or even raspberry cordial for depth and uniqueness.
- Dairy-Free Options: Use coconut milk or almond milk for a dairy-free version that doesn’t skimp on creaminess.
Storage & Make-Ahead Ideas
Should you find yourself with leftover mousse cups or wish to prepare them ahead of time, consider these strategies:
- Refrigeration: Store in an airtight container and refrigerate for up to 3 days, tightly sealed to maintain freshness.
- Freezing: While the texture may alter slightly, freezing is an option. Allow them to thaw gently in the fridge before serving.
If you’re making them ahead of time for a special event, prepare the mousse, fill the cups, and refrigerate unbaked. Bake them fresh on the day of serving for that ideal texture contrast freshly baked goods offer.
Fun Facts & Trivia
Did you know that “mousse” means “foam” in French? This aptly describes the light and airy texture that defines mousse desserts. Moreover, the addition of chocolate-laden foods and dishes was historically restricted to the elite due to the high cost of importing cocoa beans. Thankfully, today we can all appreciate and indulge in the luxury once reserved for the few.
In closing, these Baked Chocolate Mousse Cups stand as an emblem of dessert decadence and ingenuity, marrying traditional flavors with modern culinary techniques. The next time you require a dessert that carries both visual appeal and an exceptional taste, allow these delightful cups to be your choice. They’re sure to bring a touch of elegance and a rich, decadent experience to your dining table.
Ingredients
- Chocolate Mousse Base
- 1 1/2 cups dark chocolate (at least 70%)
→ Dark chocolate is the star ingredient that provides the rich, deep chocolate flavor for the mousse. Choose a high-quality chocolate to ensure a smooth texture and intense taste. Break it into small pieces for easier melting. For the best result, use chocolate with a higher cocoa content, which will yield a more flavorful mousse. - 4 large eggs, separated
→ The eggs play a crucial role, with the yolks adding richness and creaminess while the whites are whipped to create a light and airy texture. Ensure the eggs are at room temperature before using, as this will help them whip to a greater volume. Be careful to separate the yolks from the whites completely to ensure that the whites whip properly. - 1/4 cup granulated sugar
→ Sugar sweetens the mousse while also helping to stabilize the whipped egg whites. Use granulated sugar for the most straightforward texture, and be sure to mix it with the egg yolks until thick and pale. This process helps to create a fluffy mousse. Adjust the amount of sugar based on the bitterness of the chocolate used. - 1 teaspoon vanilla extract
→ Vanilla extract enhances the chocolate flavor and adds a warm aroma to the mousse. For the best flavor, opt for pure vanilla extract instead of imitation, as the latter can have synthetic undertones. Measuring carefully ensures a balanced flavor in your mousse. - Whipping Cream
- 1 cup heavy whipping cream
→ Whipping cream adds a light and creamy texture to the mousse. It should be chilled before whipping to achieve maximum volume and stability. Use heavy cream because it has a higher fat content, which will produce a richer, thicker mousse. Whip the cream until soft peaks form, being careful not to overwhip, as this can lead to a grainy consistency. - Serving and Garnishing
- Cocoa powder (for dusting)
→ Sprinkling cocoa powder on top of the mousse cups adds a touch of elegance and a hint of extra chocolate flavor. Use unsweetened cocoa powder for a more intense taste, and be sure to use a fine mesh sieve for even dusting to avoid clumps on the surface. - Chocolate shavings or curls (optional)
→ Chocolate shavings serve as a beautiful and delicious garnish that enhances the dessert’s presentation. To create shavings, use a vegetable peeler on a block of chocolate. Ensure the chocolate is at room temperature, as cold chocolate will break instead of shave, while room temperature makes it easier to curl. - Fresh berries (optional)
→ Fresh berries offer a tart complement to the rich chocolate mousse, adding freshness and a pop of color. Rinse them gently and pat them dry before serving. Berries like raspberries, strawberries, or blueberries work particularly well, providing a delightful contrast in flavor and texture.
Instructions
- Begin by preheating your oven to 350°F (175°C) for optimal temperature stabilization.
→ This guarantees that your oven reaches the desired temperature when you need it, ensuring your mousse cups set correctly during any potential baking phase. Even preheating prevents uneven cooking or sogginess. - Prepare a double boiler by filling a saucepan with a few inches of water and placing it over medium heat.
→ This indirect heating method will prevent the chocolate from seizing or burning. Make sure the water doesn’t touch the bottom of the bowl placed on top; the goal is to heat the chocolate slowly and evenly. - Place 1 1/2 cups of broken dark chocolate into a heatproof bowl and set it over the simmering water.
→ Continuously stir the chocolate with a spatula as it melts to avoid hot spots that could cause it to burn. This transforms the chocolate into a silky consistency essential for your mousse base. - While the chocolate is melting, separate 4 large eggs into two bowls—yolks in one and whites in another.
→ Use clean hands or egg shells to avoid any yolk in the whites, as any fat can inhibit them from whipping to full volume. This step is crucial for achieving the light and airy texture of the mousse. - Whisk the egg yolks with 1/4 cup of granulated sugar until the mixture becomes thick and pale.
→ This process, known as “ribbon stage,” allows the yolks and sugar to aerate properly, which is essential for creating a luxurious mouthfeel in your mousse. The sugar will also help to dissolve any graininess. - Add 1 teaspoon of vanilla extract to the yolk and sugar mixture and combine thoroughly.
→ This addition enhances the overall flavor profile of the mousse, complementing the richness of the chocolate without overpowering it. Be sure to blend well for a uniform taste. - Once the chocolate has melted completely and is smooth, remove the bowl from the double boiler and let it cool slightly.
→ Allowing it to cool prevents the heat from cooking the egg yolks prematurely. This cooling step is critical to maintaining the consistency and preventing curdling. - Carefully incorporate the cooled melted chocolate into the egg yolk mixture, stirring gently to combine.
→ Ensure that you fold the chocolate in thoroughly without deflating the yolks, which will help maintain aeration in the mousse and give it a luscious texture. - Take the egg whites and use a clean, dry mixing bowl along with an electric mixer to whip them until soft peaks form.
→ Whip on medium speed and watch closely; soft peaks need to be reached just before stiff peaks stabilize. This is crucial as it creates the lightness in your mousse. Avoid overwhipping to prevent a grainy texture. - Gently fold the whipped egg whites into the chocolate mixture in three additions.
→ Use a rubber spatula to fold carefully, starting from the bottom and moving upwards, ensuring you don’t deflate the egg whites. This folding process incorporates air without losing volume, crucial for a fluffy mousse. - In a separate chilled bowl, whip 1 cup of heavy whipping cream until soft peaks form as well.
→ Ensure the cream is cold to achieve the best volume. Whipping cream too long can lead to a grainy appearance; stop once soft peaks emerge for perfect integration into the mousse. - Fold the whipped cream into the chocolate and egg mixture in two parts, maintaining the mousse’s light texture.
→ Fold gently as with the egg whites, allowing the lightness of the whipped cream to blend without losing air bubbles, which are the key to creating the mousse’s signature airy structure. - Once fully combined, divide the mousse between serving cups or glasses and smooth the tops with a spatula.
→ Aim for an even distribution for aesthetic appeal, and this step also ensures consistent serving sizes, making it easier for guests to enjoy their dessert. - Chill the mousse cups in the refrigerator for at least 2 hours, or until set.
→ This chilling time allows the flavors to meld and the texture to firm up, creating the perfect balance of creaminess and richness necessary in a good mousse. - Before serving, dust each mousse cup with unsweetened cocoa powder using a fine mesh sieve for even coverage.
→ This final touch adds an elegant look and an extra layer of chocolate flavor, enhancing the dessert’s presentation. Strain the cocoa to avoid clumps for a professional finish. - Optionally, garnish with chocolate shavings or curls for added visual appeal.
→ Make these by using a vegetable peeler against a block of chocolate; this creates intricate designs that can elevate the dish. Ensure your chocolate is at room temperature for best results. - Serve the mousse cups topped with fresh berries if desired, to enhance flavor contrast.
→ Rinse and dry the berries gently, placing them on top or around the mousse. Choose vibrant berries like raspberries or strawberries for a delightful burst of color and freshness alongside the rich chocolate.
Notes
These Baked Chocolate Mousse Cups are an indulgent dessert that showcases the deep, rich flavor of dark chocolate while being surprisingly light and airy. The combination of whipped egg whites and heavy whipping cream creates a decadent treat that feels luxurious yet not too heavy. To ensure a perfectly smooth mousse, it’s essential to melt the dark chocolate gently, either using a double boiler or in short bursts in the microwave, stirring frequently.
When preparing the mousse, make sure your mixing bowls and utensils are free from grease; even a small amount can prevent the egg whites from whipping to their full volume. For a delightful flavor twist, consider adding a splash of espresso or coffee liqueur to the chocolate mixture, which can enhance the chocolate notes and add depth to your dessert.
After baking, let the mousse cups cool to room temperature before refrigerating them to set. This not only enhances the flavor but also ensures the perfect texture. If you’re making these in advance, they can be stored in the refrigerator for up to three days, making them perfect for entertaining.
For a stunning presentation, consider doubling the garnishes. You can layer the chocolate mousse in beautiful glasses or ramekins and alternate between layers of chocolate and whipped cream, then top with fresh berries or chocolate shavings for an impressive dessert that will wow your guests. Enjoy these mousse cups as a special treat for dinner parties, birthdays, or a cozy night in.
Tips
Cooking Tips for Baked Chocolate Mousse Cups
- Melting Chocolate: When melting the dark chocolate, use a double boiler or microwave in short bursts (15-20 seconds), stirring frequently to prevent burning. Ensure the bowl doesn’t touch the simmering water if using a double boiler to avoid moisture in the chocolate.
- Egg Separation: To ensure your egg whites whip properly, make sure no yolk is mixed in. You can crack the eggs one at a time into a small bowl before adding the whites to the mixing bowl to check for any shell fragments or yolk contamination.
- Whipping Egg Whites: Use a clean, dry bowl to whip egg whites. Any grease or moisture can prevent them from achieving maximum volume. For added stability, consider adding a pinch of cream of tartar before whipping.
- Folding Technique: When incorporating the whipped cream into the chocolate mixture, use a gentle folding motion rather than stirring. This helps retain the airiness of the cream, keeping your mousse light and fluffy.
- Chilling Time: Allow the mousse to chill in the refrigerator for at least 2 hours before serving. This time helps it set properly, ensuring the right texture and flavor development.
- Portioning: For serving, consider using small cups or ramekins for a more elegant presentation. This not only looks appealing but also helps with portion control, making it a perfect dessert for entertaining.
- Customization: Feel free to customize your mousse cups by experimenting with different flavor extracts or incorporating crushed cookies or nuts in between layers for added texture and flavor.
FAQ
What are Baked Chocolate Mousse Cups?
Baked Chocolate Mousse Cups are a decadent dessert made from a rich chocolate mousse mixture, baked to perfection in individual cups. They combine the light and airy texture of mousse with a slightly firm exterior, creating a delightful contrast in every bite.
How long does it take to prepare Baked Chocolate Mousse Cups?
The preparation time for Baked Chocolate Mousse Cups typically takes about 20-30 minutes, while the baking time is around 15-20 minutes. Allow additional time for cooling and chilling before serving.
Can I make Baked Chocolate Mousse Cups ahead of time?
Yes, you can make the mousse cups ahead of time. They can be stored in the refrigerator for 1-2 days. Just make sure to cover them to prevent them from absorbing any odors from the fridge.
Can I use different types of chocolate?
Absolutely! You can use dark, milk, or even white chocolate, depending on your preference. Each type of chocolate will give a unique flavor to the mousse cups.
What should I serve with Baked Chocolate Mousse Cups?
Baked Chocolate Mousse Cups pair wonderfully with whipped cream, fresh berries, or a drizzle of chocolate or caramel sauce. Adding a sprinkle of sea salt on top can enhance the chocolate flavor as well.
Are Baked Chocolate Mousse Cups gluten-free?
Yes, Baked Chocolate Mousse Cups can be made gluten-free, as they typically do not contain flour. Always check the chocolate and other ingredients to ensure they are gluten-free.
What is the best way to store leftovers?
Store any leftover Baked Chocolate Mousse Cups in an airtight container in the refrigerator. They are best enjoyed within 2-3 days for optimal freshness and taste.
Can I add flavors like coffee or vanilla?
Yes, you can enhance the flavor of your Baked Chocolate Mousse Cups by adding a teaspoon of espresso powder or vanilla extract to the chocolate mixture before baking. This will add depth to the chocolate flavor.