Introduction: A Burst of Flavor in Every Bite
Immerse yourself in the vibrant world of flavors with our delightful Mini Veggie Quesadillas. Picture this: a crispy and golden exterior encasing a melty, savory filling that bursts with the fresh taste of garden vegetables. These tiny treasures are not just a feast for the taste buds but a visual and aromatic delight that will transport you straight to the heart of Mexican cuisine. Effortlessly combining texture, taste, and tradition, Mini Veggie Quesadillas are the perfect small bites for transforming any gathering into a festive affair.
The Story Behind the Dish: A Tribute to Mexican Tradition
Quesadillas, a beloved staple in Mexican households, trace their origins back to the 16th century following the Spanish introduction of dairy products to the region. Originally a simple tortilla filled with cheese, the quesadilla has evolved over the centuries, now embracing a myriad of fillings that reflect the rich and diverse palette of Mexican cuisine. Our Mini Veggie Quesadillas pay homage to this culinary tradition, celebrating Mexico’s agricultural bounty with a colorful array of seasonal vegetables. Each bite tells a story of cultural fusion, where every ingredient adds its unique chapter to the narrative of Mexican heritage.
Why You’ll Love This Recipe
- Quick & Easy: Perfect for weeknight dinners or spontaneous gatherings, these quesadillas come together in minutes.
- Healthy & Nutritious: Packed with seasonal vegetables, they are a delicious way to help you meet your daily veggie intake.
- Family-Friendly: Adaptable to suit everyone’s taste, making it ideal for both children and adults alike.
- Customizable: Offers countless opportunities for personal adaptations and variations.
- Vegetarian Delight: Satisfying yet meat-free, making it a suitable choice for vegetarians without compromising on flavor.
Flavor Profile & Texture: A Symphony of Senses
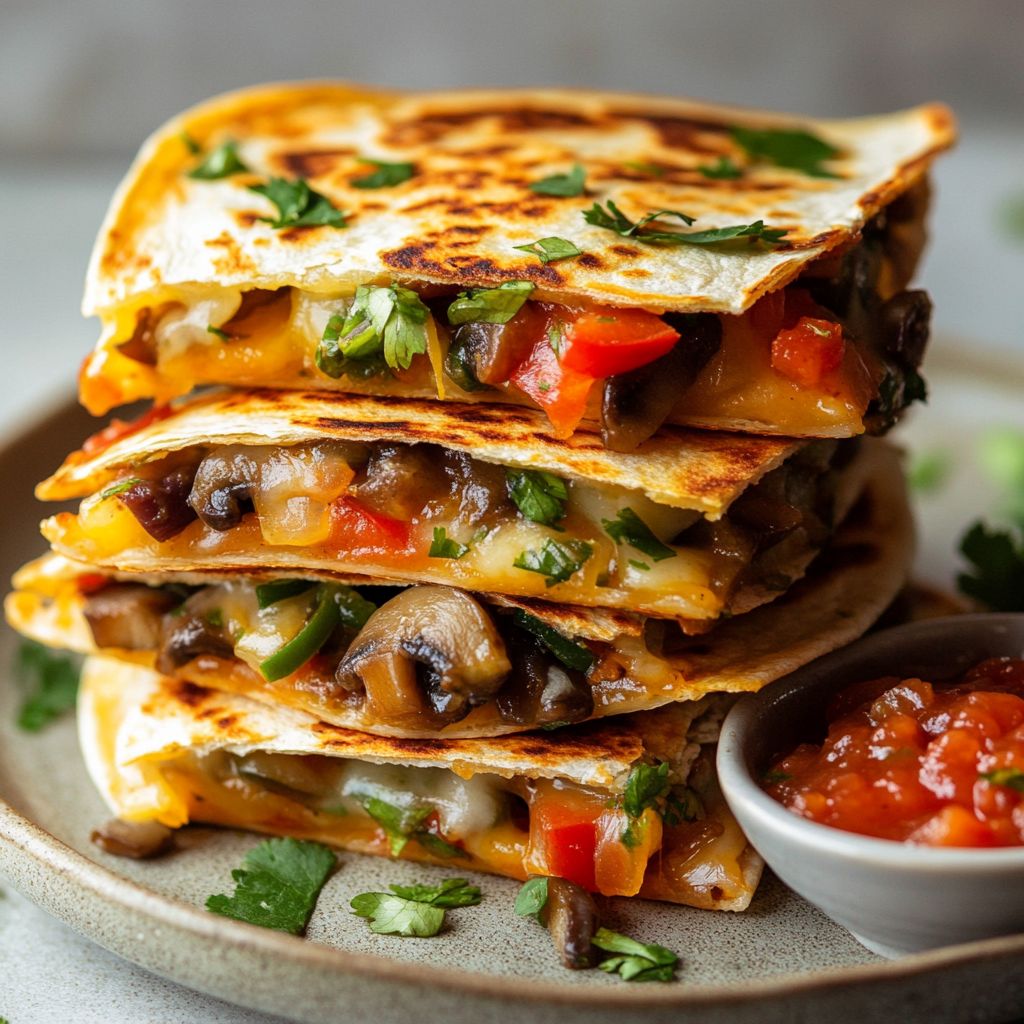
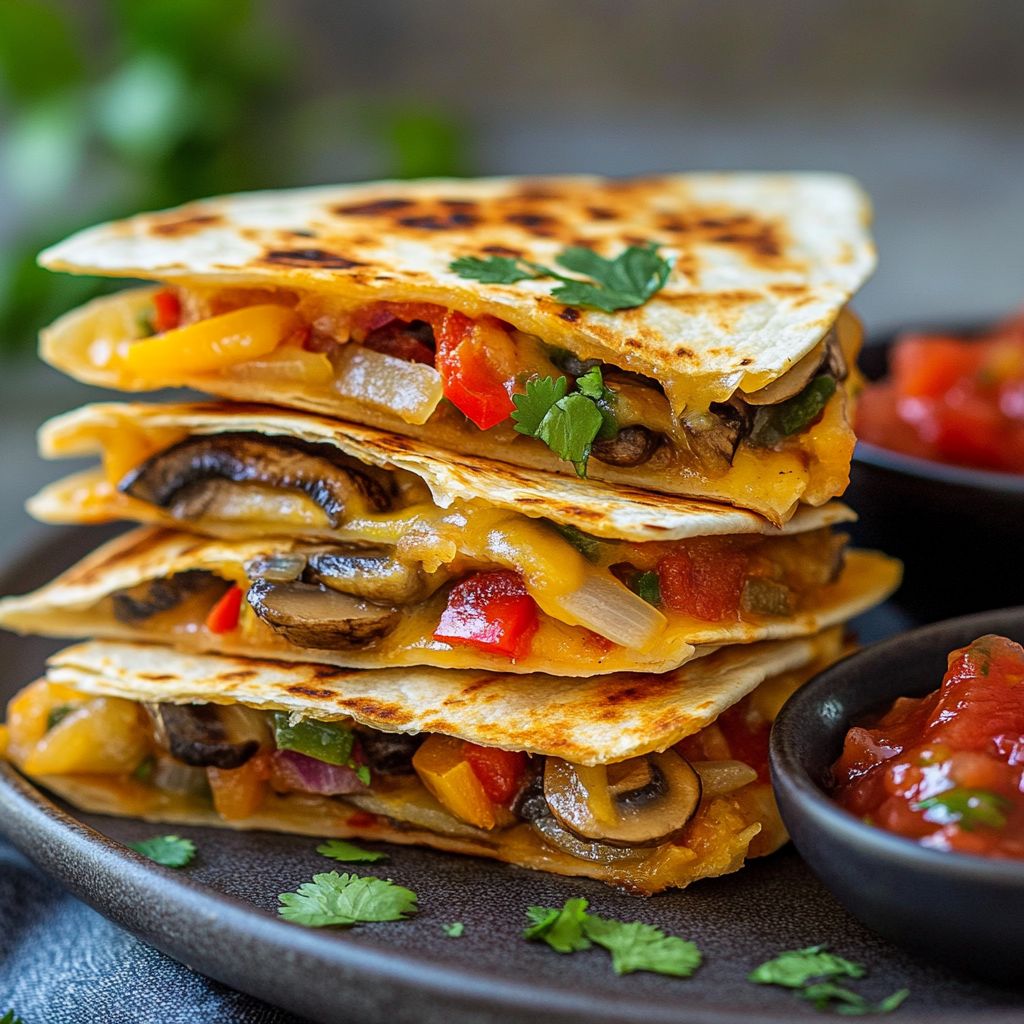
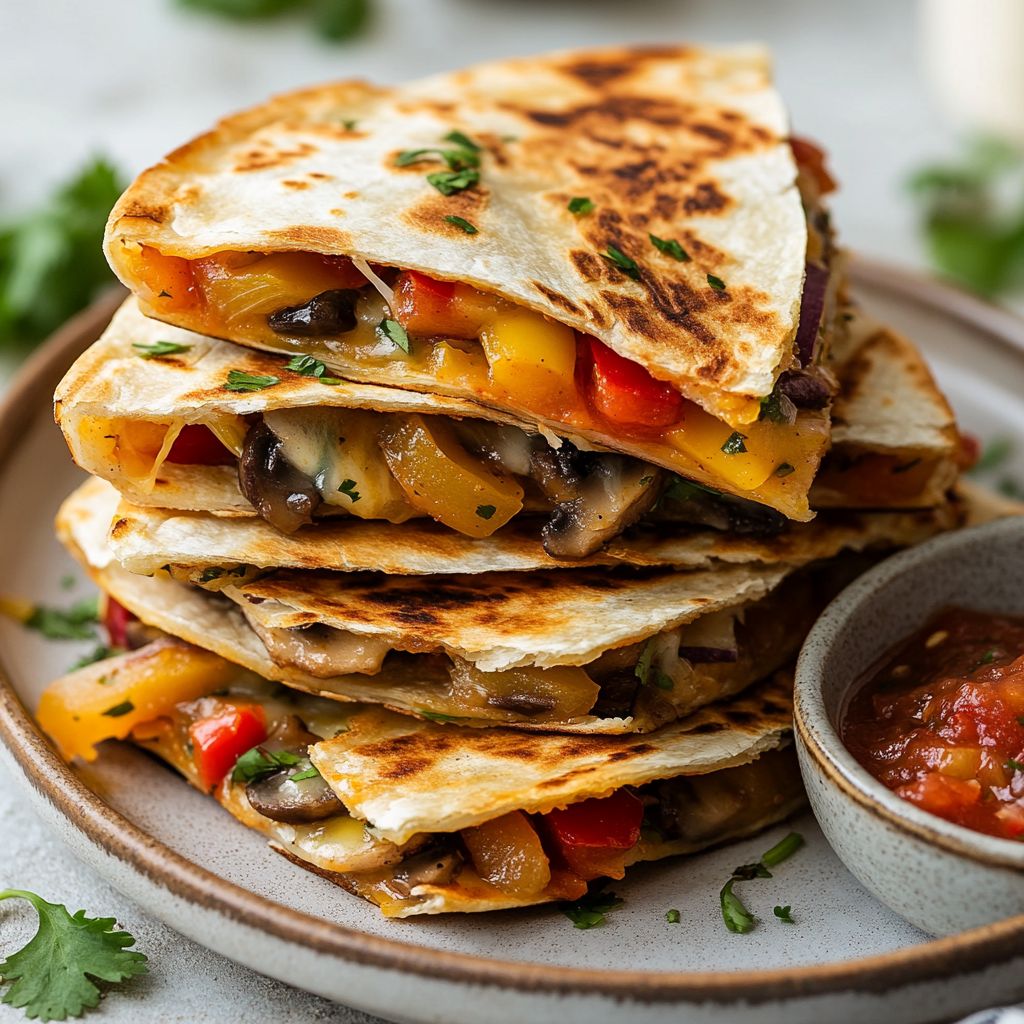
Mini Veggie Quesadillas offer a tantalizing flavor journey. The heart of this dish lies in its fillings – an ensemble of vibrant vegetables sautéed until they release an aromatic harmony of flavors. Imagine crisp bell peppers mingling with the mild sweetness of corn, all brought together by the warming embrace of melted cheese. The tortilla, toasted to perfection, provides a satisfyingly crunchy contrast to the gooey interiors, ensuring that every bite delivers a dynamic balance of textures that is sure to delight your taste buds.
Occasions & Pairings: Celebrate Any Time, Anywhere
These quesadillas are nothing if not versatile, making them suitable for an array of occasions. Serve them as enticing appetizers at a party or as a quick snack on a lazy afternoon. They also shine as a delightful breakfast option along with a side of fresh salsa. Pair these with a refreshing margarita for an authentic Mexican dining experience, or perhaps with a tangy ceviche to enhance the flavor profile of a Mexican-themed lunch. For dessert, consider a rich chocolate flan or churros to round out your meal with a sweet finish.
Tips, Variations & Substitutions: Make It Your Own
Get creative with your Mini Veggie Quesadillas to match your preferences or dietary requirements. For a spicier kick, add jalapeños to the filling or pour a hot salsa over the finished quesadillas. Looking for a vegan version? Swap out the cheese for a plant-based alternative and ensure that the tortillas do not contain any animal products. For additional protein, consider adding black beans or tempeh. Regional variations can be explored by incorporating local vegetables and seasonings to give this timeless dish a personal signature.
Storage & Make-Ahead Ideas: Convenience at Its Best
Mini Veggie Quesadillas are as convenient as they are delicious. If you find yourself with leftovers, simply store them in an airtight container in the refrigerator where they can last up to three days. Reheating is a breeze: just place them in a preheated oven for about 10 minutes to maximize their crispy texture. For those who like being ahead of schedule, the filling can be made a day in advance. Alternatively, assemble the quesadillas and freeze them; they can go from freezer to table in no time with a quick bake.
Fun Facts & Trivia: Did You Know?
Quesadillas are so beloved in Mexico that there’s even a debate surrounding the necessity of cheese in one. In Mexico City and a few other regions, a quesadilla is defined by the tortilla and the filling – cheese is optional! The word “quesadilla” comes from the Spanish word for cheese, “queso,” but in modern times, fillings can range from mushrooms and squash blossoms to potatoes and chorizo, proving that versatility and creativity go hand in hand in the world of quesadillas.
In conclusion, Mini Veggie Quesadillas hold a special place not only in Mexican culinary tradition but also in the hearts of food lovers worldwide. They embody the perfect blend of nostalgia and innovation, offering a dish that is as enjoyable to make as it is to eat. Whether you’re creating a cultural experience or simply looking for a quick, satisfying meal, these little quesadillas promise joy in every bite.
Ingredients
- Flour Tortillas
→ Flour tortillas serve as the base for the quesadillas, holding all the delicious fillings together. Opt for small tortillas, typically around 6 inches in diameter, for mini versions that are perfect for snacks or appetizers. Fresh tortillas will provide the best texture and flavor; if using pre-packaged, ensure they are soft and pliable for easier folding and grilling. - 1 cup shredded cheese (cheddar or Monterey Jack)
→ Cheese adds richness and a gooey texture, acting as the glue that binds the fillings inside the tortillas. Shred your cheese from a block rather than using pre-shredded to avoid anti-caking agents that can affect melting. Use a mix of cheddar for sharpness and Monterey Jack for creaminess for a balanced flavor. - 1/2 cup bell peppers (chopped)
→ Bell peppers provide a sweet crunch and vibrant color to the quesadillas. Use a mix of red, yellow, and green for a variety of flavors and visual appeal. Chop them into small, uniform pieces to ensure even cooking, and consider sautéing them briefly before adding to the quesadilla for enhanced sweetness and reduced moisture. - 1/2 cup mushrooms (sliced)
→ Mushrooms add umami flavor and a meaty texture while keeping the quesadillas moist. Choose button or cremini mushrooms for their mild taste. Slice them thinly for quicker cooking, and sauté them until they are browned and any excess moisture has evaporated, preventing sogginess in the final quesadilla. - 1/2 cup spinach (packed)
→ Spinach adds a nutritious boost and vibrant green color to the filling. Use fresh spinach, as it wilts beautifully during cooking. Pack the leaves tightly when measuring to ensure you get enough; cook them just until wilted to retain their bright color and nutrients before adding to your quesadilla. - 1/4 cup red onion (finely chopped)
→ Red onion contributes a sharp bite and subtle sweetness to the quesadilla. Finely chop the onion to ensure it cooks down quickly and doesn’t overwhelm the other flavors. For a milder taste, you can soak the chopped onion in cold water for a few minutes before adding it to the filling, which helps to mellow its sharpness. - Spices (cumin and chili powder)
→ A blend of spices like cumin and chili powder elevates the flavor profile, adding warmth and depth to the quesadilla filling. Use about 1/2 teaspoon of each, adjusting to taste. Toasting the spices in a dry pan for a minute before adding them to the mixture enhances their flavors and aroma, making the dish more aromatic and flavorful. - Cooking oil (olive oil or vegetable oil)
→ Oil is necessary for cooking the quesadillas, providing the needed fat for crispy edges and helping to prevent sticking. Use a light oil like olive oil for flavor or vegetable oil for a neutral taste. Heat the oil in the pan before adding the quesadillas to ensure they brown nicely.
Instructions
- Gather all ingredients and kitchen tools required for preparation.
→ This includes flour tortillas, cheese, bell peppers, mushrooms, spinach, red onion, spices, cooking oil, a cutting board, knife, sauté pan, and a spatula. Having everything at hand streamlines the cooking process and ensures you don’t miss any vital steps or elements. - Prepare the vegetables by washing and chopping them.
→ Rinse the bell peppers and spinach under cold water to remove any dirt. Cut the bell peppers into small, even pieces to ensure they cook uniformly. For mushrooms, slice thinly to encourage browning and moisture release. Chop red onion finely to distribute the flavor evenly in the mixture. This initial prep not only saves time but also helps maintain flavor and texture throughout cooking. - Sauté the bell peppers, mushrooms, and red onion in a non-stick sauté pan.
→ Heat about 1 tablespoon of cooking oil over medium heat in the pan. Once hot, add the chopped vegetables. Stir frequently for about 4-5 minutes or until softened and slightly browned, which enhances their sweetness and reduces moisture content. This step adds depth and flavor to the filling, ensuring you have a delicious and textured quesadilla. - Add the spinach to the sautéed vegetables and cook until just wilted.
→ Mix in 1/2 cup of packed fresh spinach, stirring until it wilts down, which takes about 2 minutes. This quick cooking preserves the vibrant color and nutrients of the spinach, ensuring that your filling remains healthy and visually appealing. - Season the mixture with spices and mix well.
→ After the spinach has wilted, sprinkle in 1/2 teaspoon each of cumin and chili powder, stirring to combine thoroughly. This not only adds depth of flavor but also balances the sweetness of the vegetables with a bit of warmth and spice. Make sure everything is uniformly coated to ensure every bite is flavorful. - Remove the vegetables from the heat and set the mixture aside to cool slightly.
→ This prevents the filling from becoming too hot, making it easier to handle when assembling the quesadillas. Allowing it to cool also helps the flavors meld together, improving the overall taste of your dish. - Preheat a clean sauté pan or griddle over medium heat and add a small amount of oil.
→ Use about 1/2 tablespoon of oil for frying the quesadillas. Ensure the pan is hot enough that a drop of water sizzles when added; this indicates it is ready for cooking. A properly heated pan will achieve crispy edges while keeping the filling warm. - Assemble the mini quesadillas by placing the vegetable mixture on half of each tortilla and topping with cheese.
→ Take a flour tortilla, and on one half, place a spoonful of the vegetable mixture followed by a generous sprinkle of shredded cheese. Folding the tortilla over helps encapsulate the filling and creates a neat package that cooks evenly. Be sure not to overfill to avoid spillage during cooking. - Carefully place the assembled quesadilla in the preheated pan.
→ Gently lay the folded quesadilla into the pan, ensuring it sizzles as it makes contact. This initial cooking creates a crispy texture on the outside while melting the cheese inside. Cook for about 3-4 minutes, checking occasionally to prevent burning. - Flip the quesadilla once golden brown on the first side.
→ Use a spatula to carefully turn the quesadilla over, ensuring that it stays folded. Cook for an additional 2-3 minutes on the other side until the cheese is fully melted and the tortilla is crispy. Flipping halfway through ensures an even browning on both sides. - Remove the quesadilla from the pan and cut it into wedges.
→ Once cooked, transfer the quesadilla to a cutting board and allow it to cool for a minute before slicing it into quarters with a sharp knife. Cutting while warm helps the cheese maintain its gooey texture and makes for easier eating. Serve immediately to enjoy the maximum flavor and crispy texture. - Repeat the assembly and cooking process with the remaining tortillas and filling.
→ Continue to fill and cook the remaining quesadillas, remembering to add more oil to the pan as needed to prevent sticking. Keep the finished ones warm in a low oven (200°F or 93°C) while you complete the batch to ensure they stay crispy and ready to serve. - Serve the mini veggie quesadillas hot with your choice of dipping sauces.
→ Arrange the quesadilla wedges on a platter and consider serving them with sour cream, guacamole, or salsa for an added layer of flavor. Dipping sauces not only complement the dish but also enhance the overall eating experience.
Notes
- These mini veggie quesadillas are not only quick to prepare but also versatile, allowing you to experiment with different vegetables and spices. Feel free to substitute any of the veggies for others you prefer or have on hand, such as zucchini or corn, to keep things interesting. Adding black beans or cooked chicken can also enhance the protein content.
- When assembling your quesadillas, be careful not to overfill them, as this can make them difficult to seal and may lead to spillage during cooking. Aim for a balanced amount of cheese and veggies on each tortilla.
- For a golden, crispy exterior, ensure your pan is adequately heated before adding the quesadillas, and use medium heat throughout cooking. You may need to cook them in batches to ensure they brown evenly without overcrowding the pan.
- Serve these quesadillas with your choice of dipping sauces, such as salsa, guacamole, or sour cream, to elevate the flavor experience. Adding fresh herbs like cilantro can also provide a refreshing burst of flavor.
- If you’re preparing these for a gathering, consider making a larger batch and keeping them warm in the oven at a low temperature until ready to serve. They are best enjoyed fresh but can be stored in an airtight container in the refrigerator for a few days; simply reheat in a skillet or microwave.
Tips
- Preparation of Ingredients: Before you start assembling the quesadillas, ensure all ingredients are prepped and within reach. Chop vegetables uniformly to facilitate even cooking, and have your cheese shredded and ready. This will streamline the cooking process and help you assemble quickly.
- Layering Tips: When filling your quesadillas, avoid overstuffing them. A handful of each filling should suffice to ensure the tortillas can be folded and sealed properly. Distribute the cheese evenly across the tortilla, as it will melt and help “glue” everything together.
- Heating the Tortillas: Preheat your tortillas in a dry skillet for about 10-15 seconds on each side before adding the fillings. This step makes them more pliable and enhances their flavor by warming them, making for easier folding and grilling.
- Cooking Technique: When cooking the quesadillas, use medium heat to allow the cheese to melt thoroughly without burning the tortillas. Cooking them too fast may result in crispy outsides but unmelted cheese, whereas lower heat will yield a soggier texture.
- Flipping the Quesadilla: When it’s time to flip, use a wide spatula to support the entire quesadilla. This prevents any fillings from spilling out and ensures even cooking on both sides. Cook until golden brown, typically 2-3 minutes per side.
- Serving Suggestions: Serve your mini quesadillas with an array of dips like salsa, guacamole, or sour cream for extra flavor. You can also garnish with fresh cilantro or a squeeze of lime juice for added freshness.
- Storage Tips: If you have leftovers, store them in an airtight container in the refrigerator. When reheating, use a skillet instead of a microwave to keep them crispy. Heat over medium until warmed through.
- Customization Options: Feel free to get creative with your fillings! Add legumes like black beans for extra protein, or substitute other vegetables such as zucchini or corn. Adjust the spices based on your flavor preference—try adding smoked paprika for a smoky twist.
FAQ
What ingredients do I need to make Mini Veggie Quesadillas?
To make Mini Veggie Quesadillas, you will need tortillas, cheese, bell peppers, onions, mushrooms, corn, spinach, and spices such as cumin and chili powder. You can also add other veggies as per your preference.
How do I prepare the filling for Mini Veggie Quesadillas?
Start by sautéing your chopped vegetables in a little oil until they are tender. Add spices and seasonings to taste. Mix in the cheese and cook until melted before assembling the quesadillas.
Can I use gluten-free tortillas for Mini Veggie Quesadillas?
Yes, you can definitely use gluten-free tortillas as a substitute for regular ones to make Mini Veggie Quesadillas suitable for those with gluten allergies.
How long does it take to cook Mini Veggie Quesadillas?
The cooking time for Mini Veggie Quesadillas is approximately 10-15 minutes. This includes both preparing the filling and cooking the quesadillas in a pan until golden brown and crispy.
Can I make Mini Veggie Quesadillas ahead of time?
Yes, you can prepare the filling and assemble the quesadillas ahead of time. Store them in the refrigerator for up to a day. Just cook them fresh when ready to serve for the best texture.
What can I serve with Mini Veggie Quesadillas?
Mini Veggie Quesadillas pair well with salsa, guacamole, sour cream, or a fresh salad for a complete meal.
Are Mini Veggie Quesadillas suitable for kids?
Yes, Mini Veggie Quesadillas are a great option for kids! They can be made with a variety of vegetables and can be adjusted to suit their tastes.
Can I freeze Mini Veggie Quesadillas?
Yes, Mini Veggie Quesadillas freeze well. Allow them to cool completely, then wrap them tightly and store in the freezer for up to 2 months. Reheat in the oven or toaster for best results.